Teaching with Ai8
Set up a course, hand out work, run a timed assessment, grade it and release the results. For instructors, teaching assistants and course coordinators.
What Ai8 gives your course
Your students work in Jupyter notebooks in the browser, with nothing to install. Three things are worth knowing before you plan a course around it.
Code that keeps running, and stops by itself
A student who starts a long job can close the laptop: it finishes on the server and the output is saved. A runtime nobody is using stops by itself, so a forgotten tab does not use up a student’s compute limit.
What this means for a courseAn AI agent, where you allow it
The agent explains errors and methods, edits notebook cells and runs code, asking the student before each change. It is off for coursework until you switch it on, one assignment at a time.
The agent in your courseLLM API access
For courses that teach with language models: students call models from their own notebooks, with no API keys for you to hand out. Their plan decides who has it and how much they can use.
The LLM API in your courseQuick start
Nine steps take a new course from nothing to released grades. Tick them off as you go; this browser remembers where you got to.
Home and the workspace
Home is the first page after you sign in. It lists every project you can open, with the courses you teach in a row above them. Templates and materials are ordinary projects, so you will build them here.
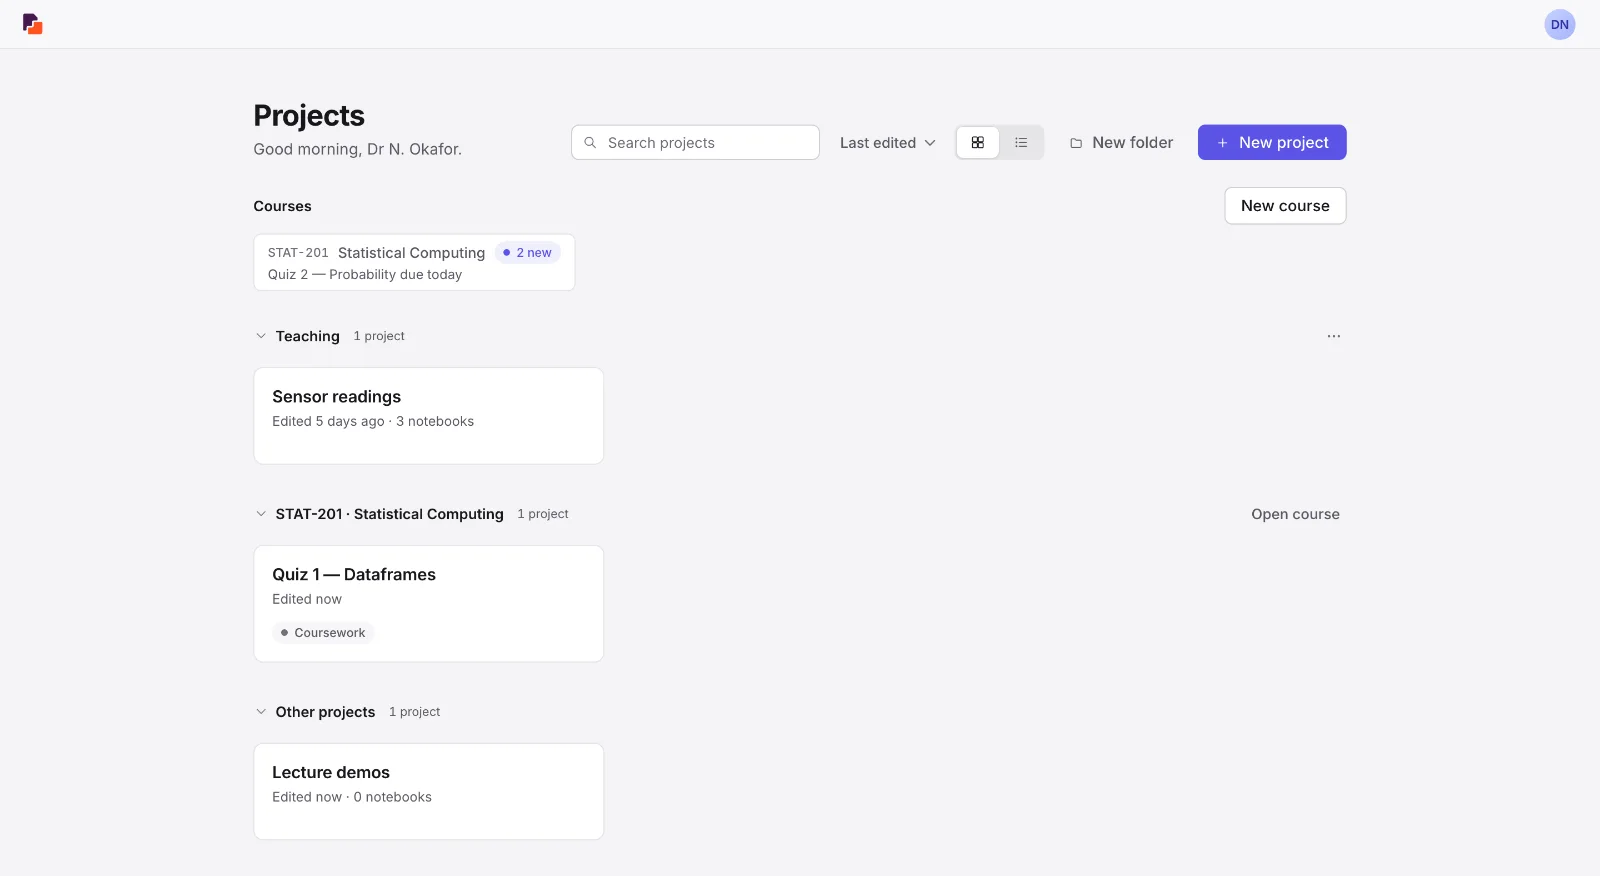
Drag projects into folders
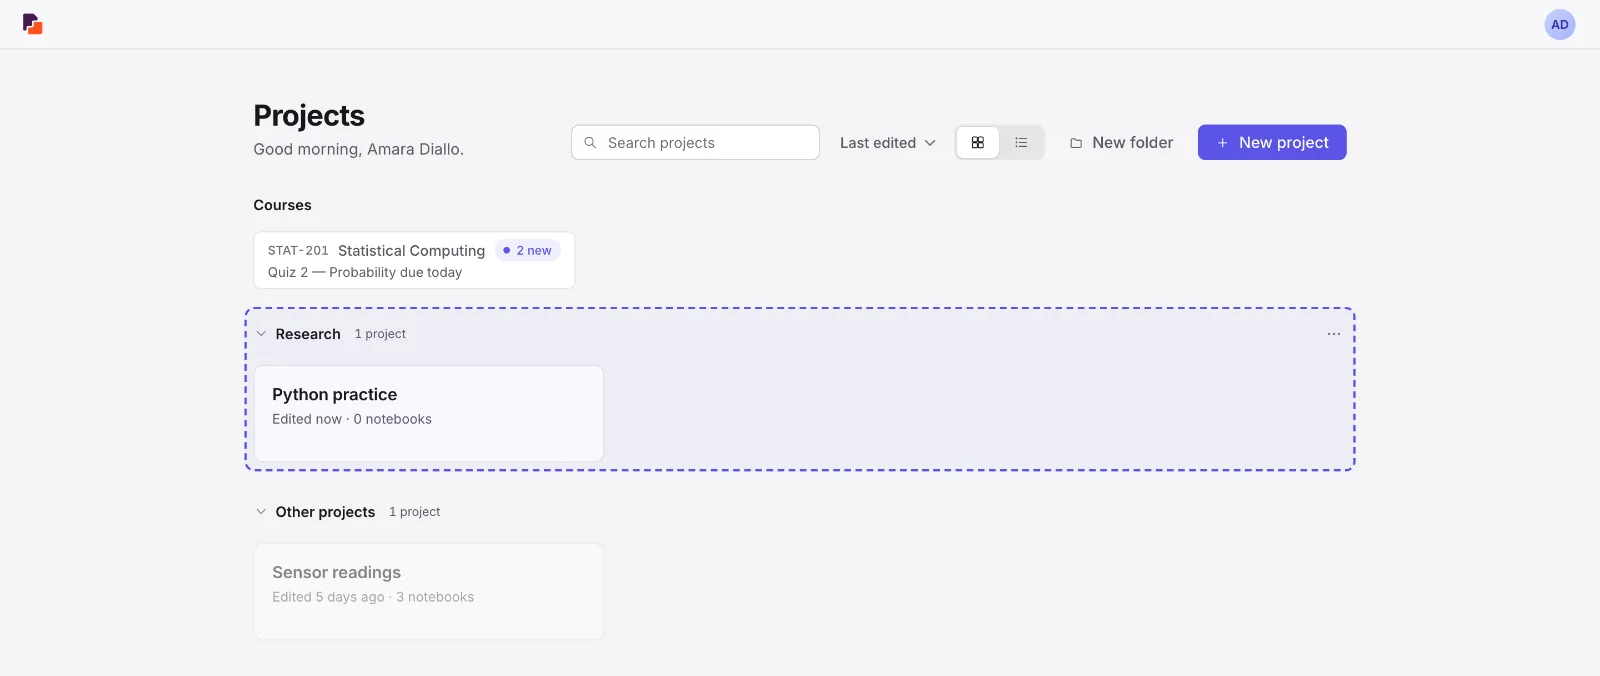
Folders keep your own Home tidy. Nobody else sees them, and deleting a folder never deletes a project. Press New folder, then drag a project’s card onto it. The folder lights up when it will take it. To take a project out again, drag it onto Other projects.
Arrange the workspace
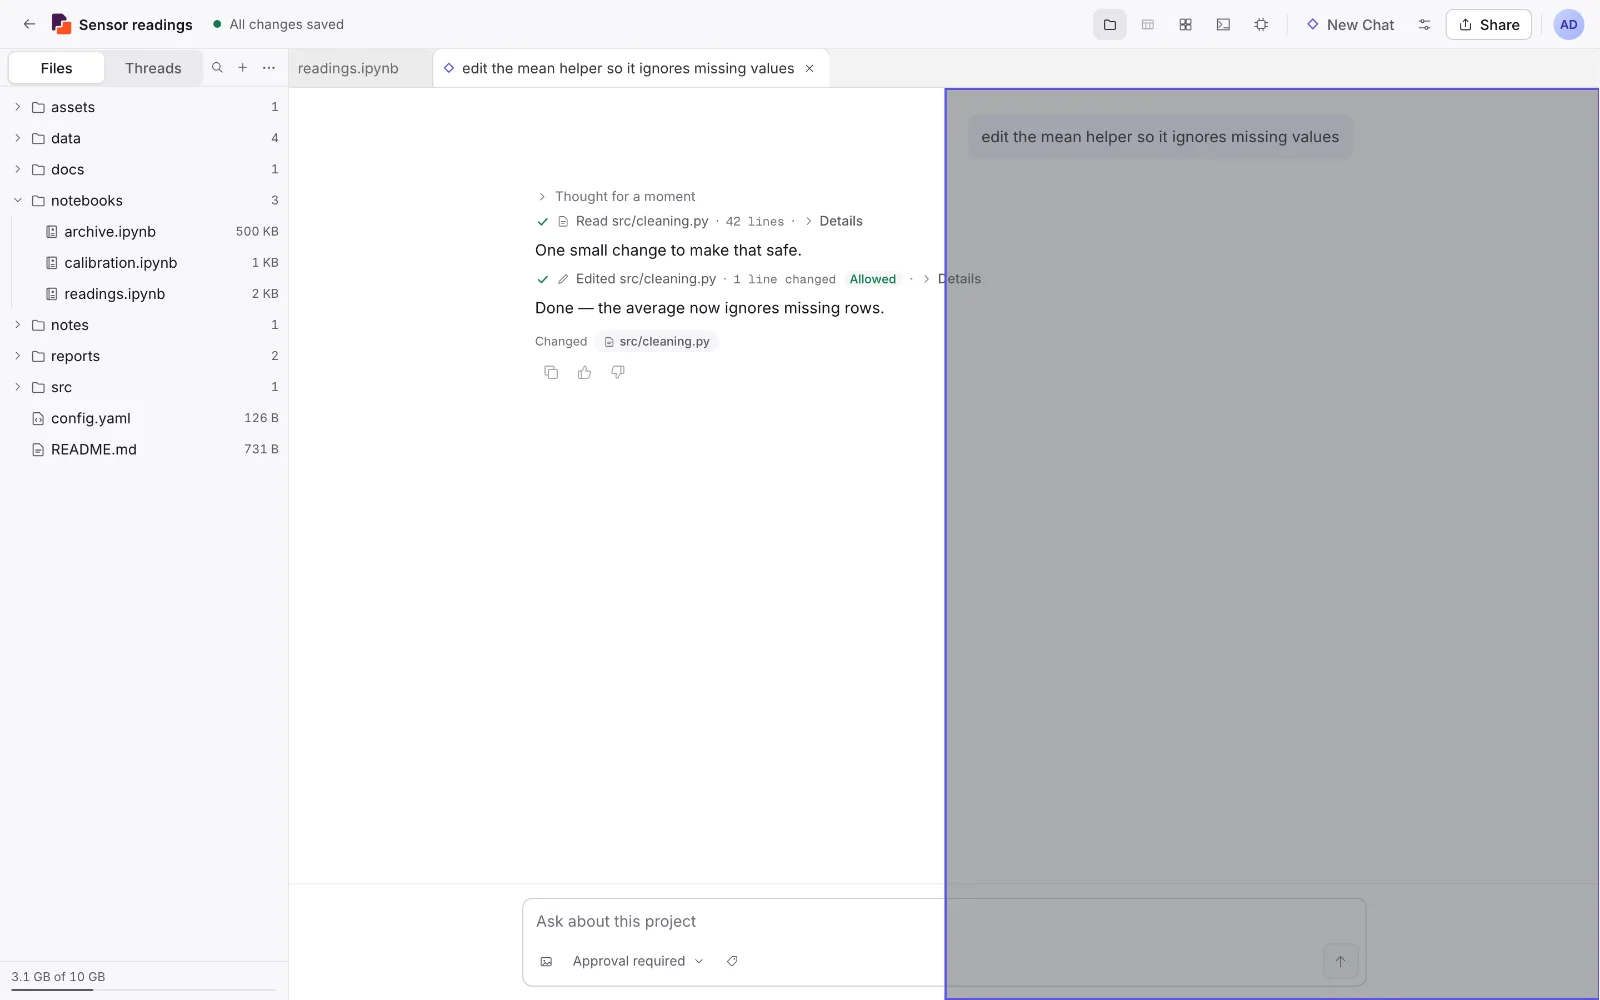
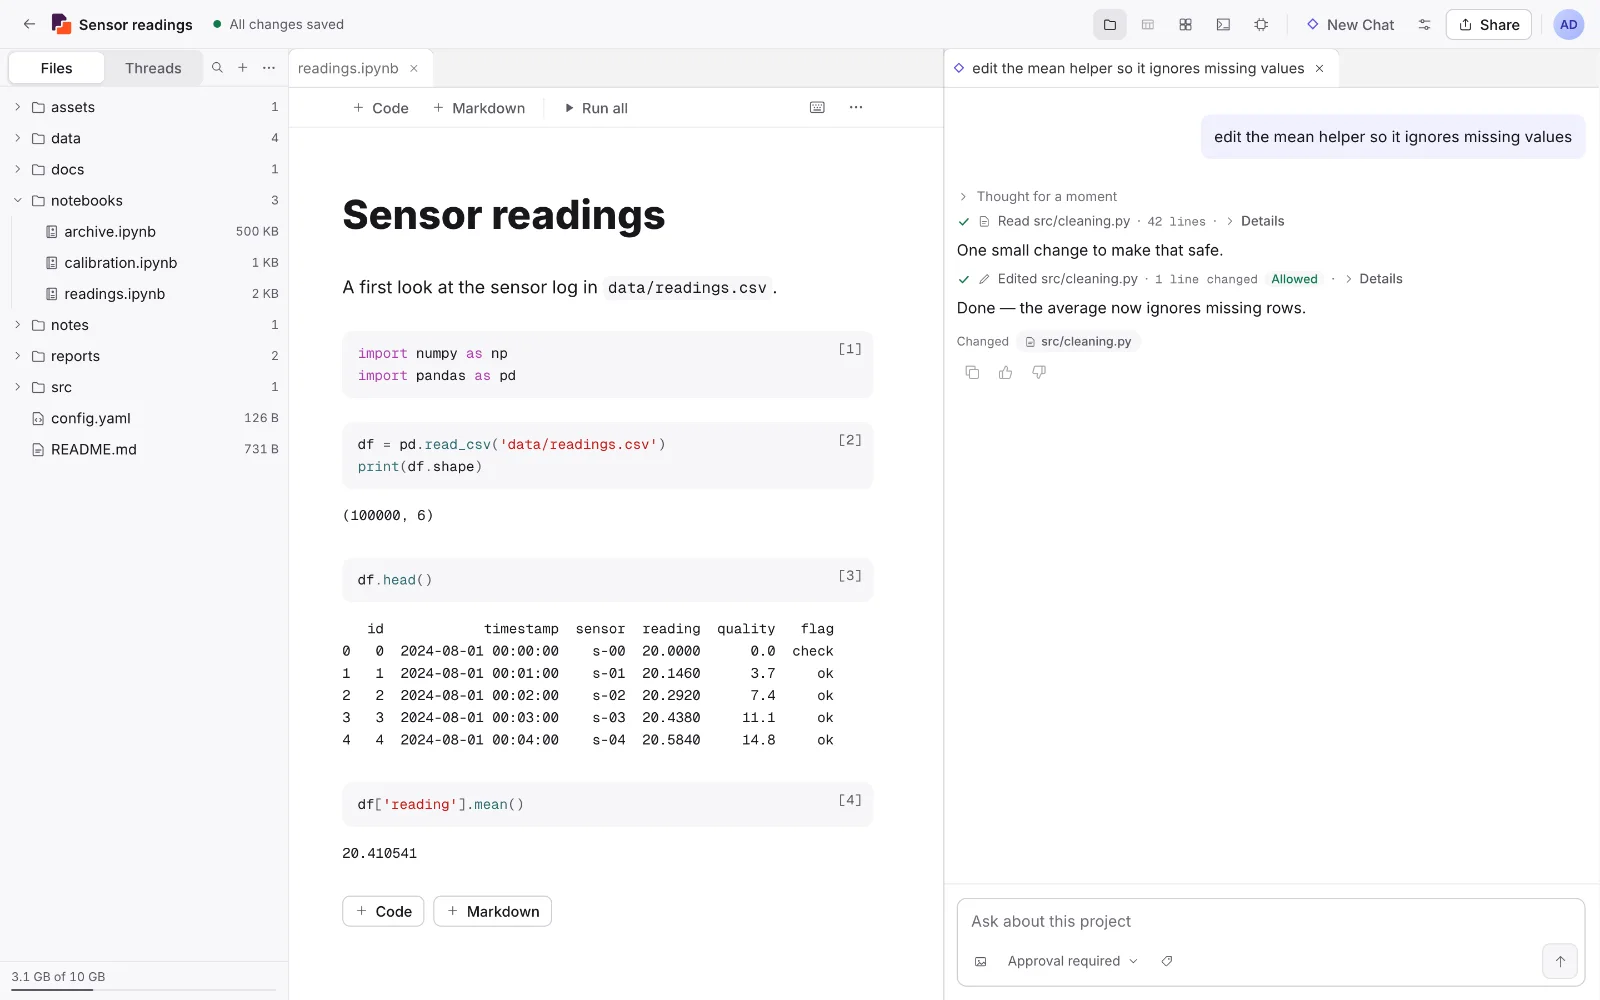
Inside a project, everything you open is a tab, and tabs can be arranged.
Put two things side by side
Drag a tab to an edge of the workspace and drop it. Try your template’s notebook beside its data, or a chat with the agent beside your code.
Reorder and regroup
Drag a tab along its strip to reorder it, or onto another group to move it there.
Make room
Ctrl 0 hides the file panel, and Ctrl Alt 0 the Runtime panel.
Your layout is remembered
Each project keeps its layout in this browser. To start again, press Ctrl K and choose Reset layout.
The student guide covers notebooks, running code and the agent in detail.
Who can do what
A course has three roles. What a role cannot do is simply absent from the screen, not greyed out.
| Student | TA | Instructor | |
|---|---|---|---|
| See the course | Yes | Yes | Yes |
| Take assignments | Yes | No | No |
| Create and edit assignments | No | Yes | Yes |
| View submissions and grade | No | Yes | Yes |
| Set up grading, change another grader’s grade, release | No | No | Yes |
| Manage the roster, sections and settings | No | No | Yes |
| Distribute materials | No | No | Yes |
| Extend deadlines and grant extra time | No | No | Yes |
Instructors and TAs cannot take their own assignments. TAs grade the work an assessment’s grading team gives them; instructors release. A workspace admin acts as an instructor on every course in the workspace.
Create a course
On Home, press New course.
Enter the course code, name and term, then press Create course. You are enrolled as its instructor, and the course gets a default section.
Open the course. Its Home shows Set up this course, with three shortcuts: Add people, Create an assignment and Post a welcome.
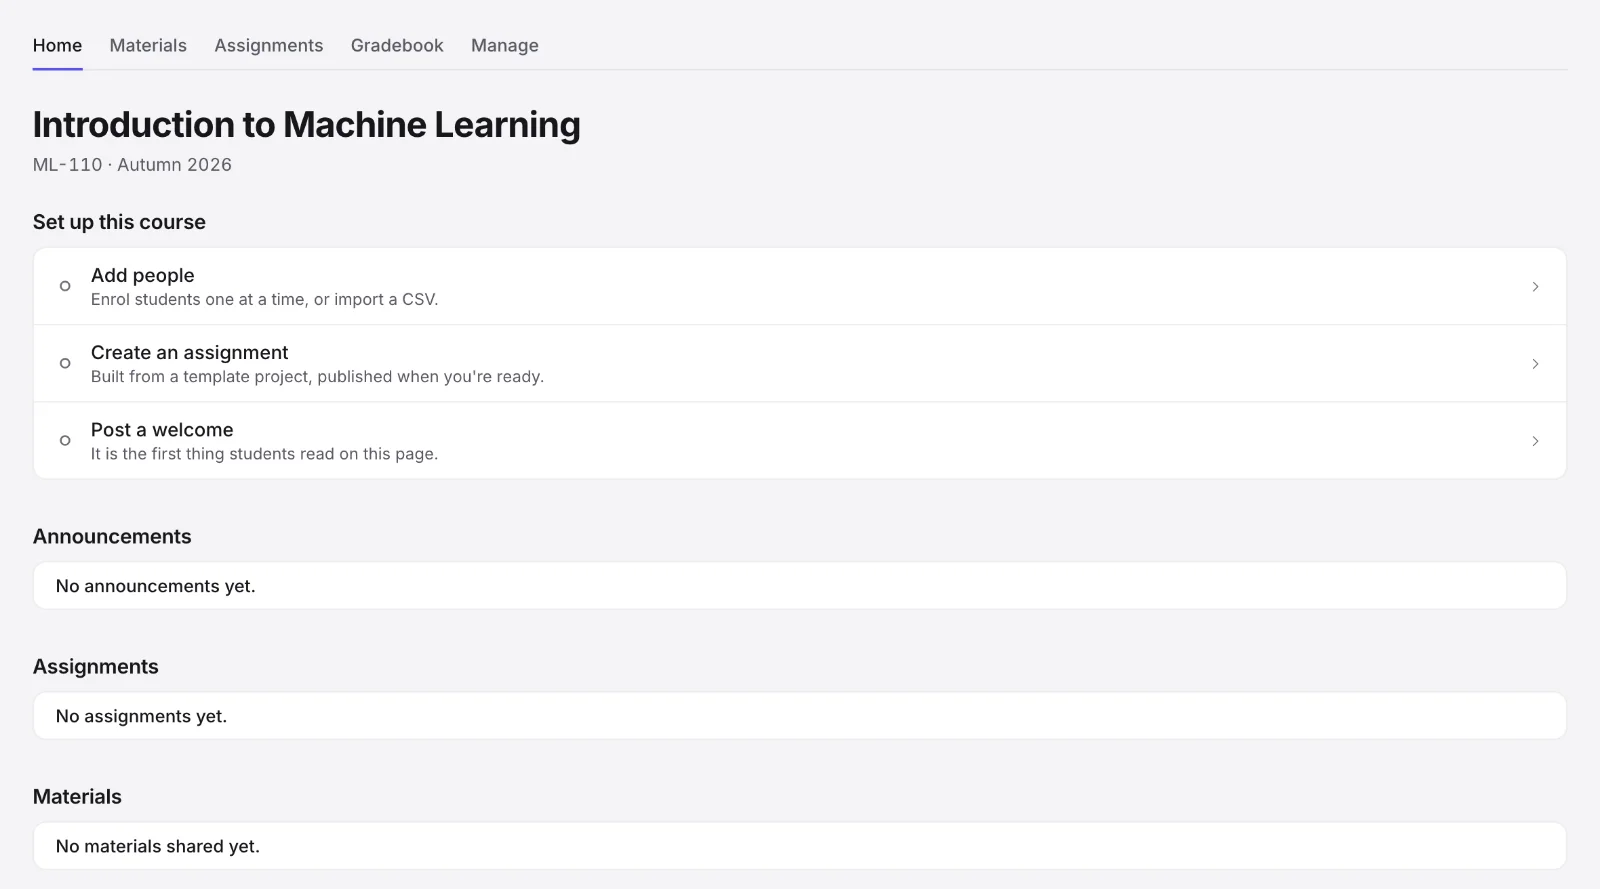
Finding your way around a course
| Tab | What it is for |
|---|---|
| Home | What needs your attention, then announcements, assignments and materials. |
| Materials | Projects and files you hand out, and who has received them. |
| Assignments | Every assignment, and the way in to each one’s own page. |
| Gradebook | Students by assignments, with totals and the CSV export. |
| Manage | Roster, Sections, Import, Announcements and Settings. Instructors only. |
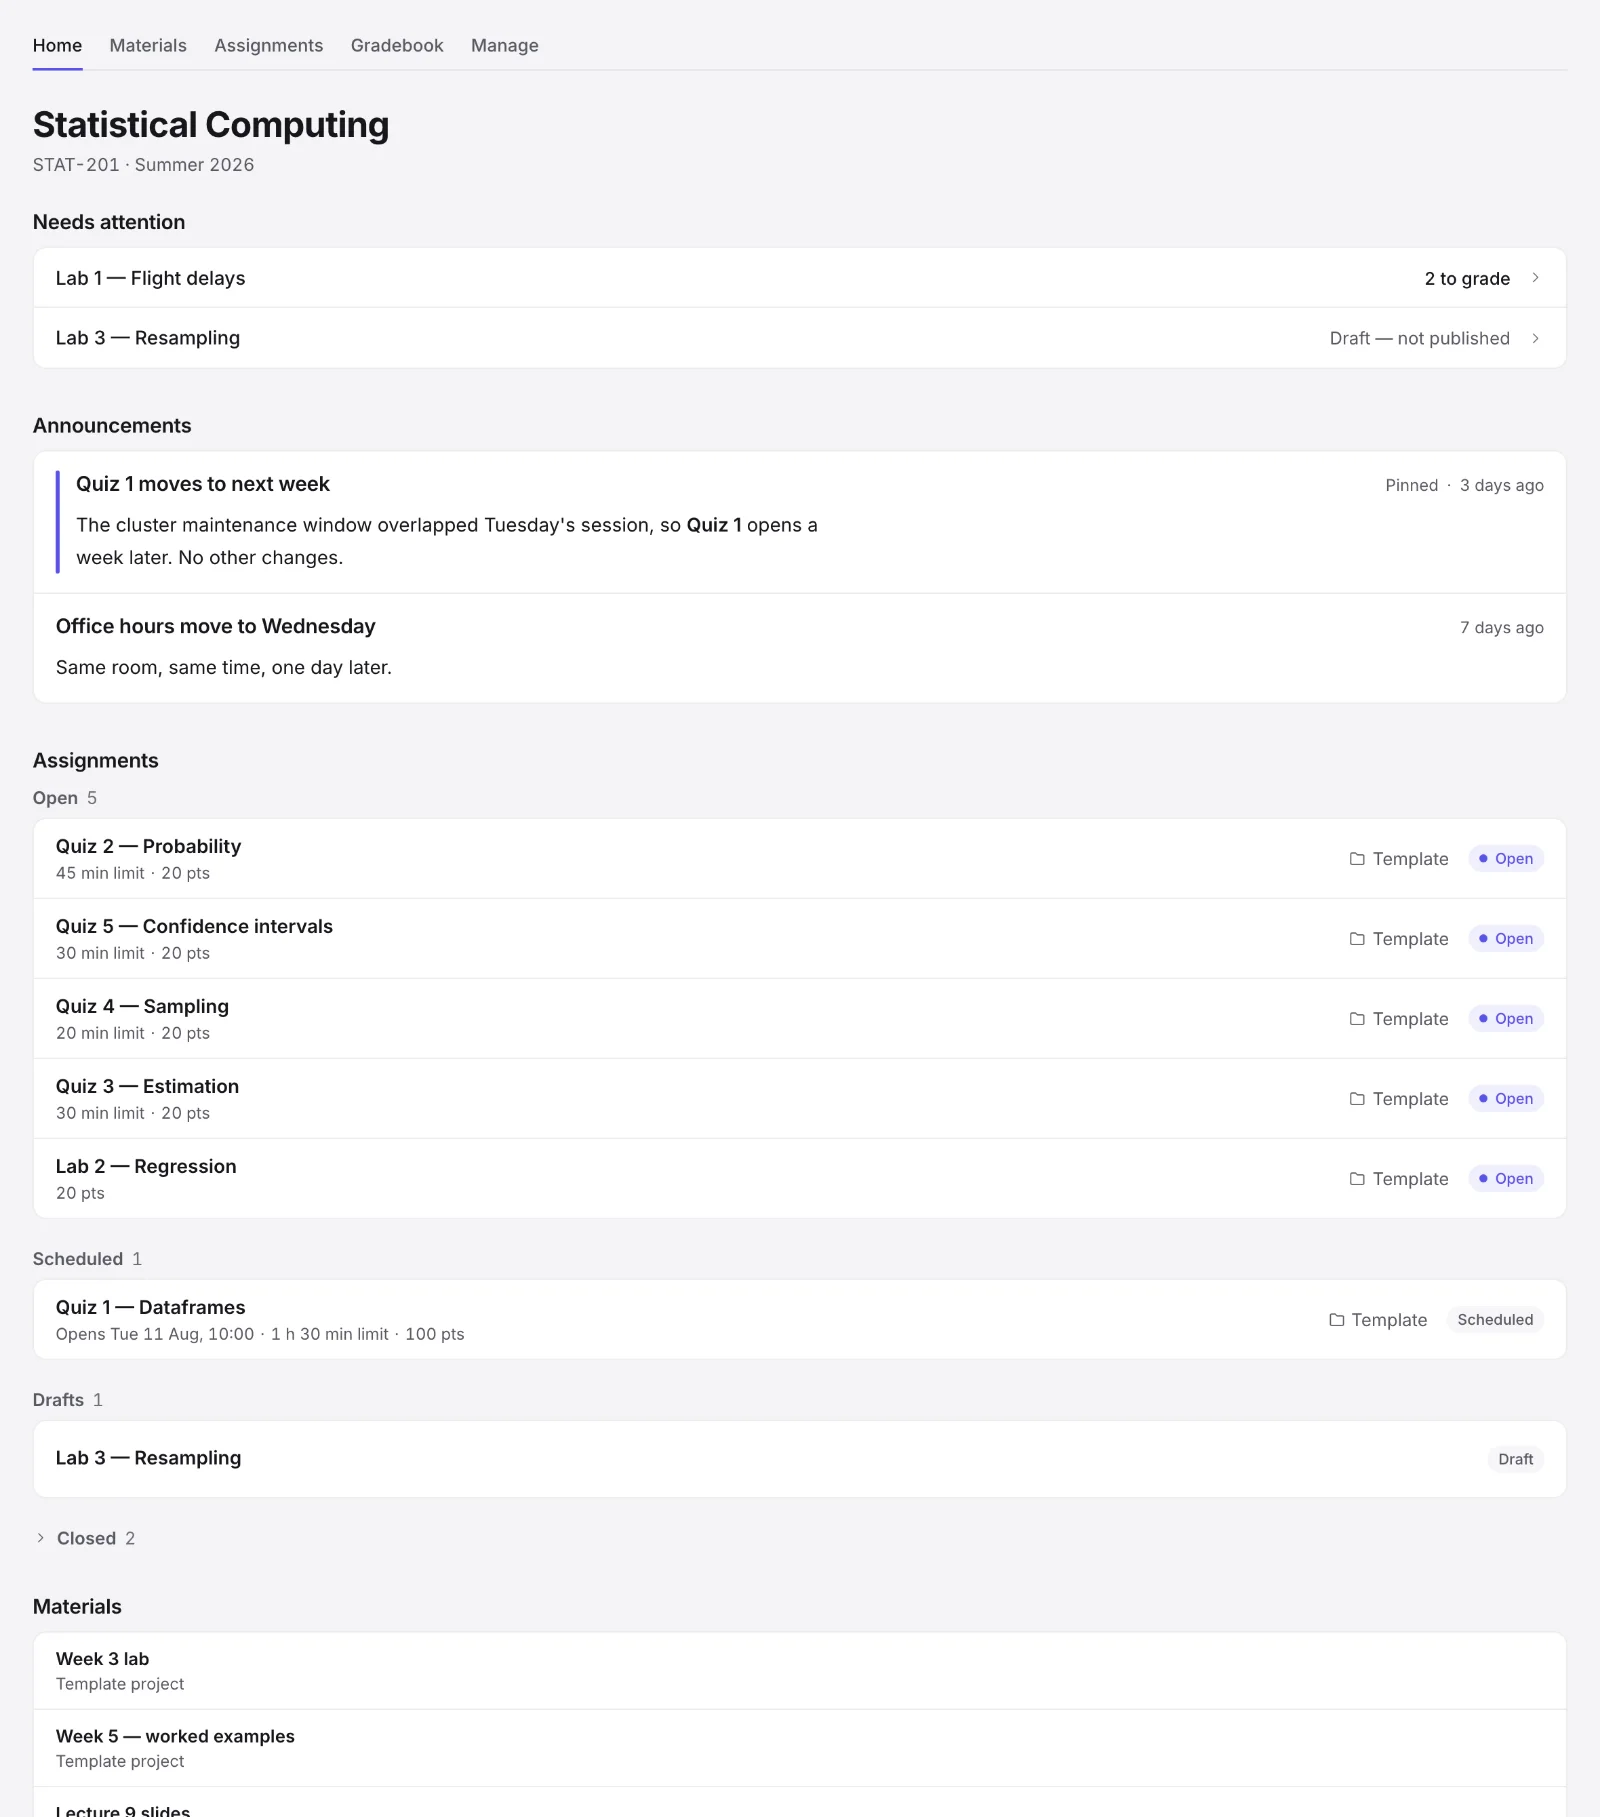
- Course tabs — Home, Materials, Assignments, Gradebook and Manage. You only see the tabs your role can use.
- Needs attention — One line per thing waiting for you. Each links straight to where you deal with it.
- Assignments — Grouped as Open, Scheduled, Drafts and Closed. Click a title to open that assignment’s own page.
Needs attention
The course Home opens on what is waiting for you, one line each, linked to where you deal with it: Lab 1 · 2 to grade, Lab 1 · 3 graded, not released, Lab 2 · Due in 2 hours, Lab 3 · Draft — not published.
Sections
A section is a group of students inside the course. Every student belongs to one. Add, rename and delete sections under Manage, Sections. A section can be deleted only when nobody is enrolled in it.
Settings and archiving
Manage, Settings edits the code, name, description and term, sets the default environment and compute for new assignments, and holds the course-wide AI switch. Archive makes the course read-only at the end of term. Nothing is deleted, and you can un-archive it.
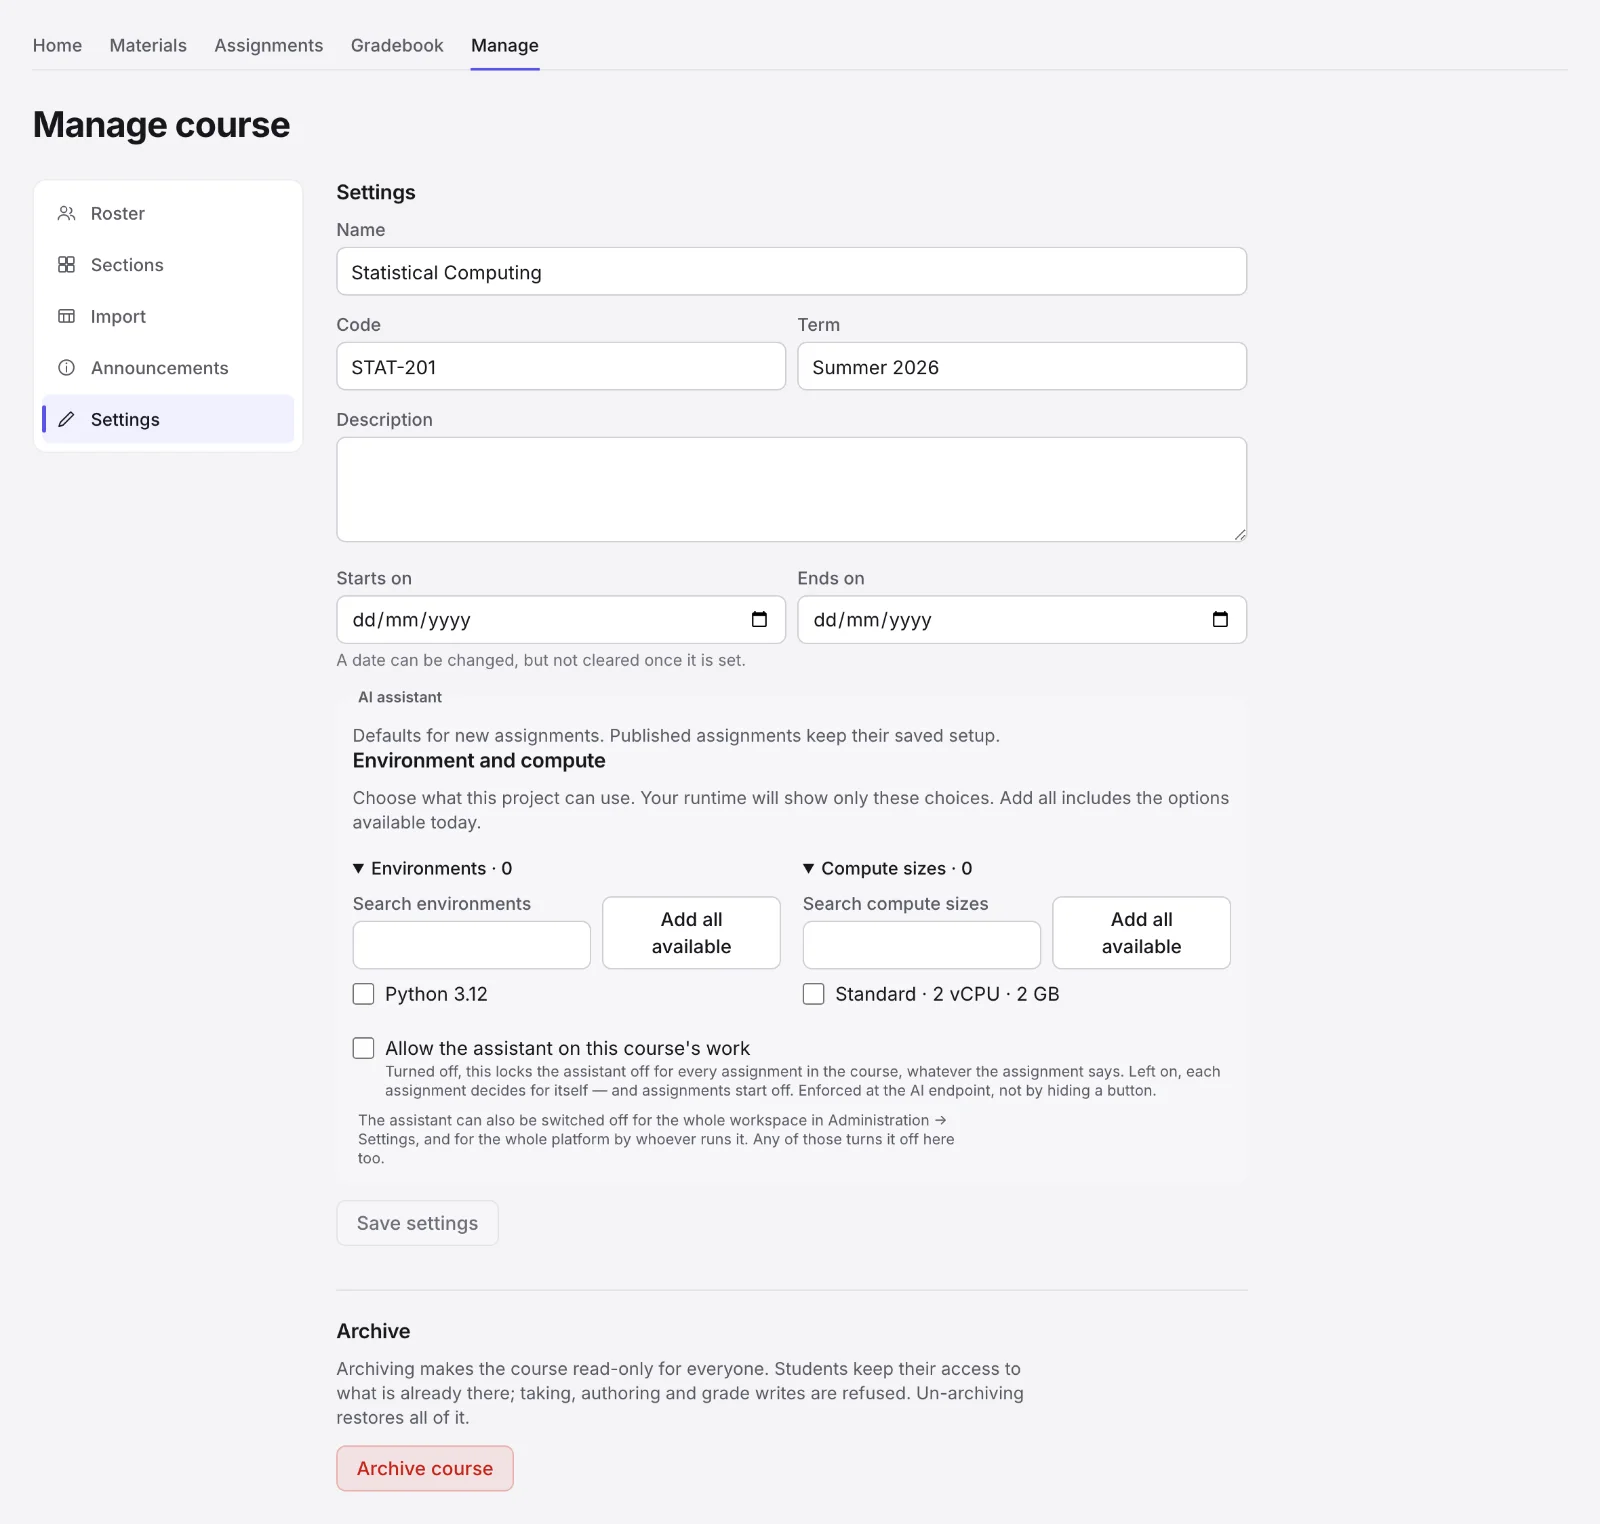
Add your students
Everything here is under Manage, Roster and Manage, Import.
One person at a time
Enter an email address, pick a section and a role, and press Add. If the person already has an account they are enrolled at once. If not, Ai8 emails them an invitation and they are enrolled when they accept. Until then the roster shows Invited — awaiting acceptance.
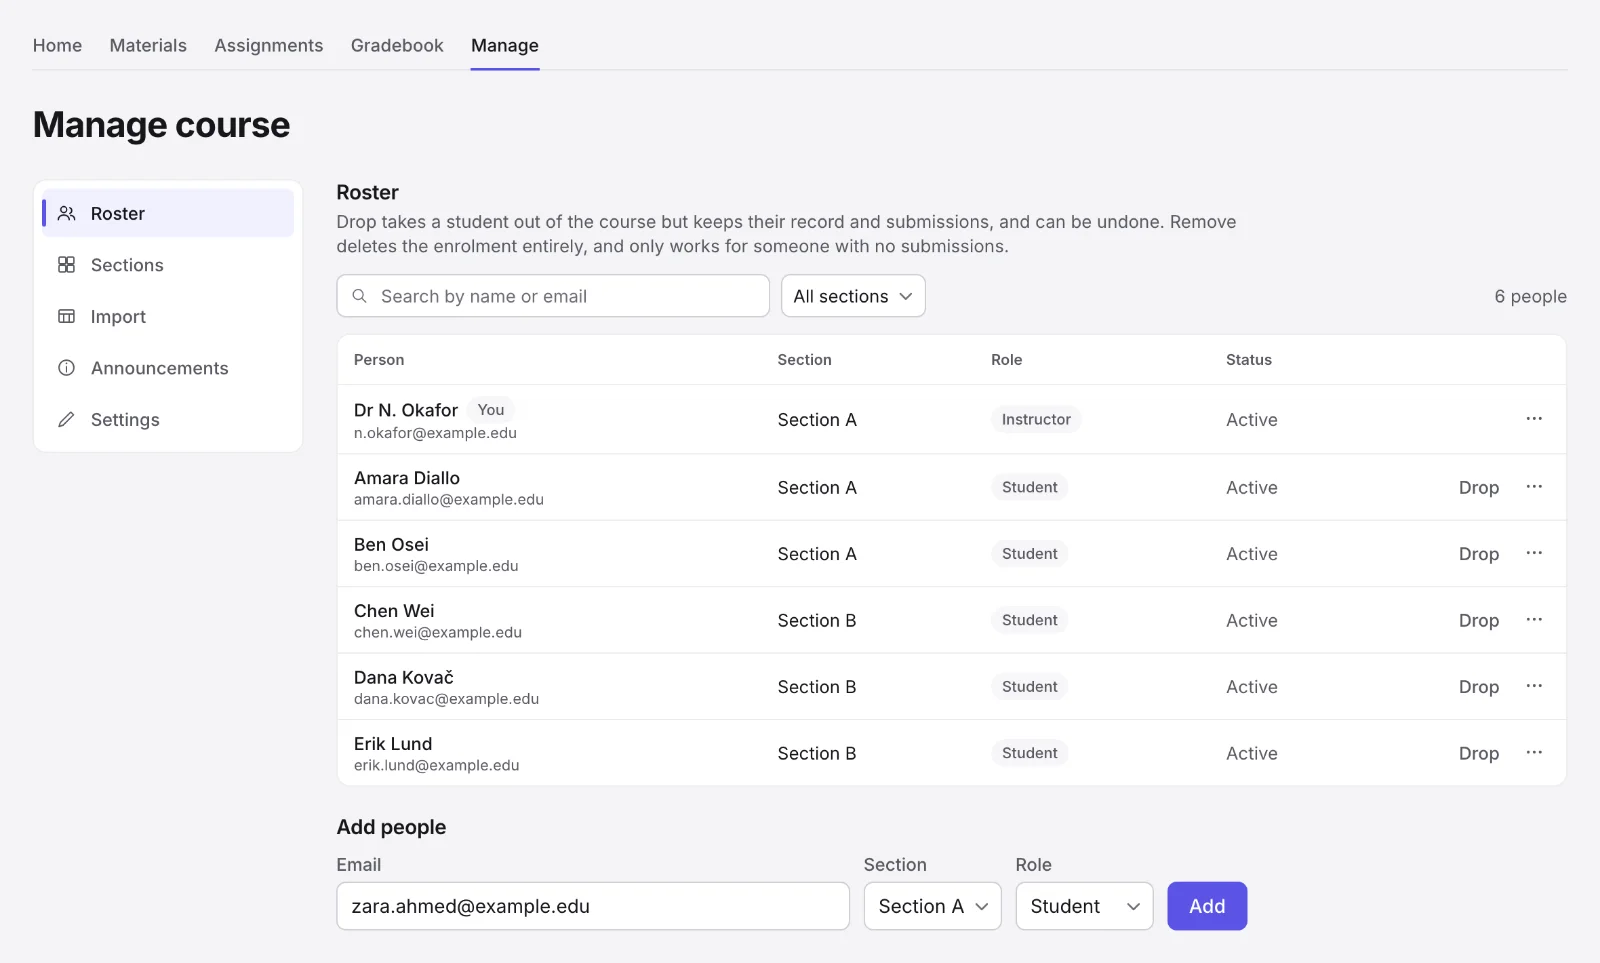
A whole class from a CSV file
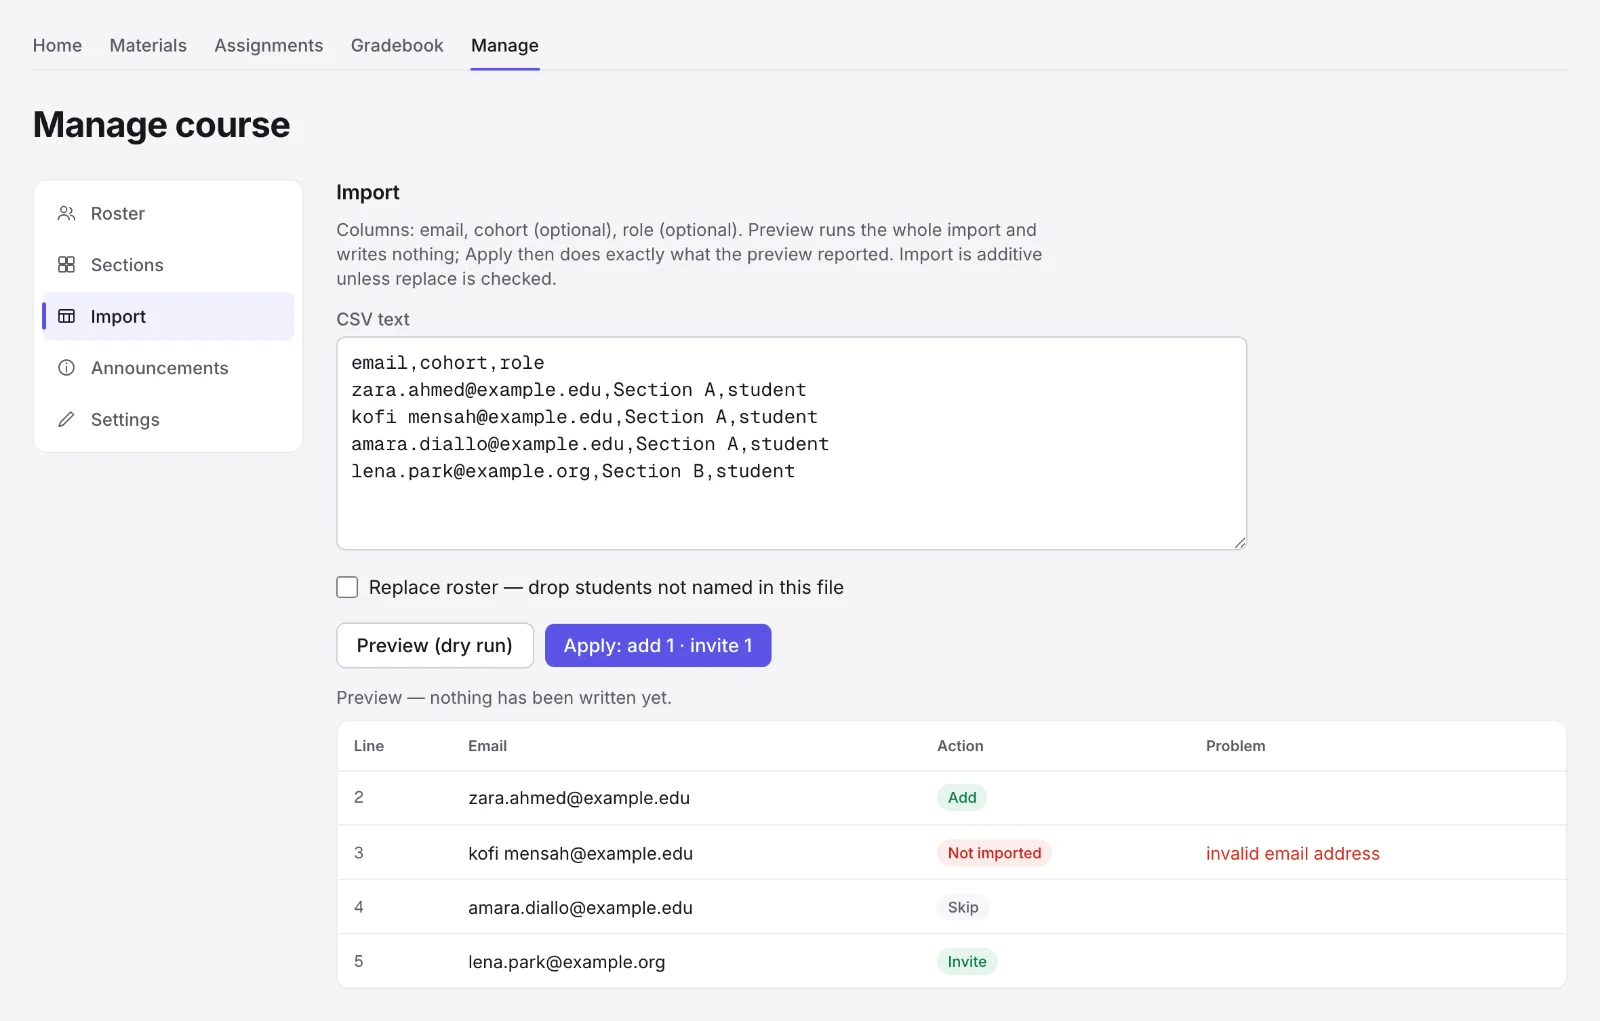
Prepare CSV text with a header row and one person per line. Only email is required; cohort is the section name and role is student, ta or instructor. Most spreadsheets can save a sheet as CSV.
email,cohort,role
student@example.com,Section A,student
ta@example.com,Section A,ta
another@example.com,,
Paste the text into CSV text and press Preview (dry run). Nothing is written yet.
Read the report. Each line says what will happen: Add, Update, Invite, Skip or Not imported, with the reason.
Press the apply button, which states exactly what it will do, for example Apply: add 12 · invite 3.
When a student leaves
Drop
Takes the student out of the course and keeps their record and submissions. It can be undone with Reactivate. Use this in almost every case.
Remove
Deletes the enrolment entirely. It only works for someone with no submissions.
Share materials
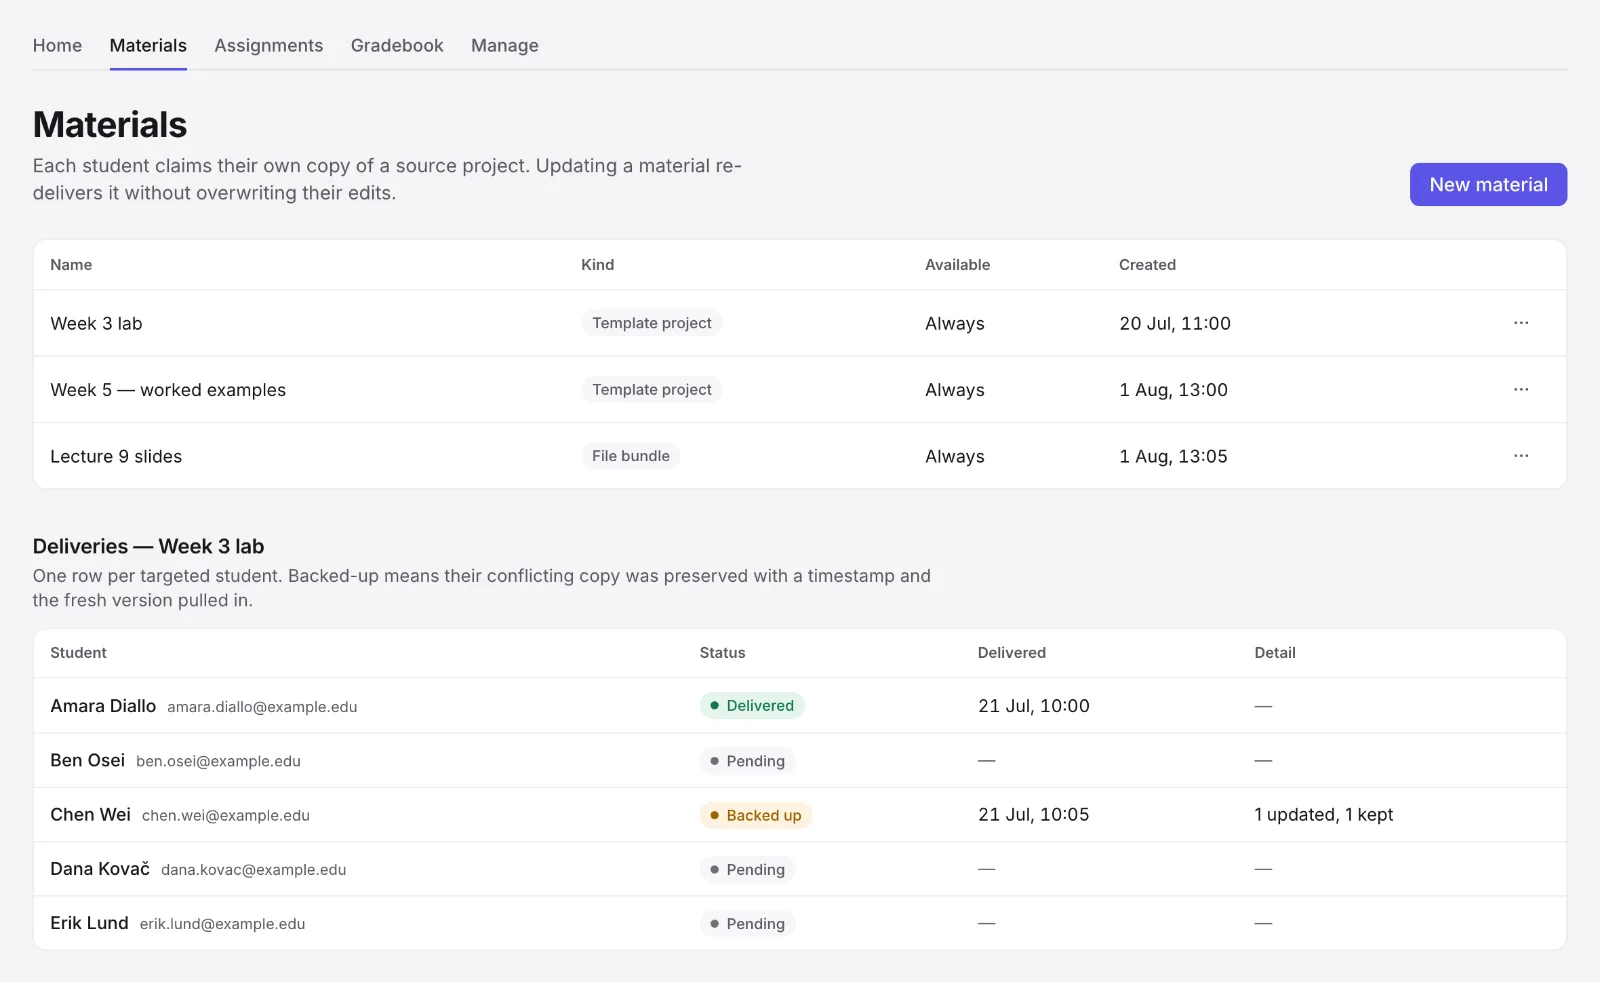
A material is a project or a set of files you hand out, such as lecture notebooks or a dataset. Each student gets their own copy.
Put the files in a project of your own.
In the course, open Materials and press New material.
Name it, choose Template project or File bundle, pick the source project, optionally set when it is available, and press Distribute.
Updating a material later
Edit the source project, then save the material with Save & re-deliver. New and changed files arrive in every student’s copy. Where a student has edited the same file, their version stays and a timestamped backup is kept, so nothing is lost. Delivery status lists each student as Pending, Delivered, Backed up or Failed.
Withdraw stops further delivery. Copies students already have are theirs and are left untouched.
Create an assignment
An assignment hands each student their own copy of a template project, with a deadline the server keeps. There are three kinds, Assignment, Quiz and Exam. The kind only names it for students; the rules come from the settings you choose.
1. Build the template project
Create an ordinary project and put in it exactly what a student should start with: the notebook with your questions, any data files, and nothing you do not want them to see. Run it once to check it works in the environment you plan to use.
2. Fill in the settings
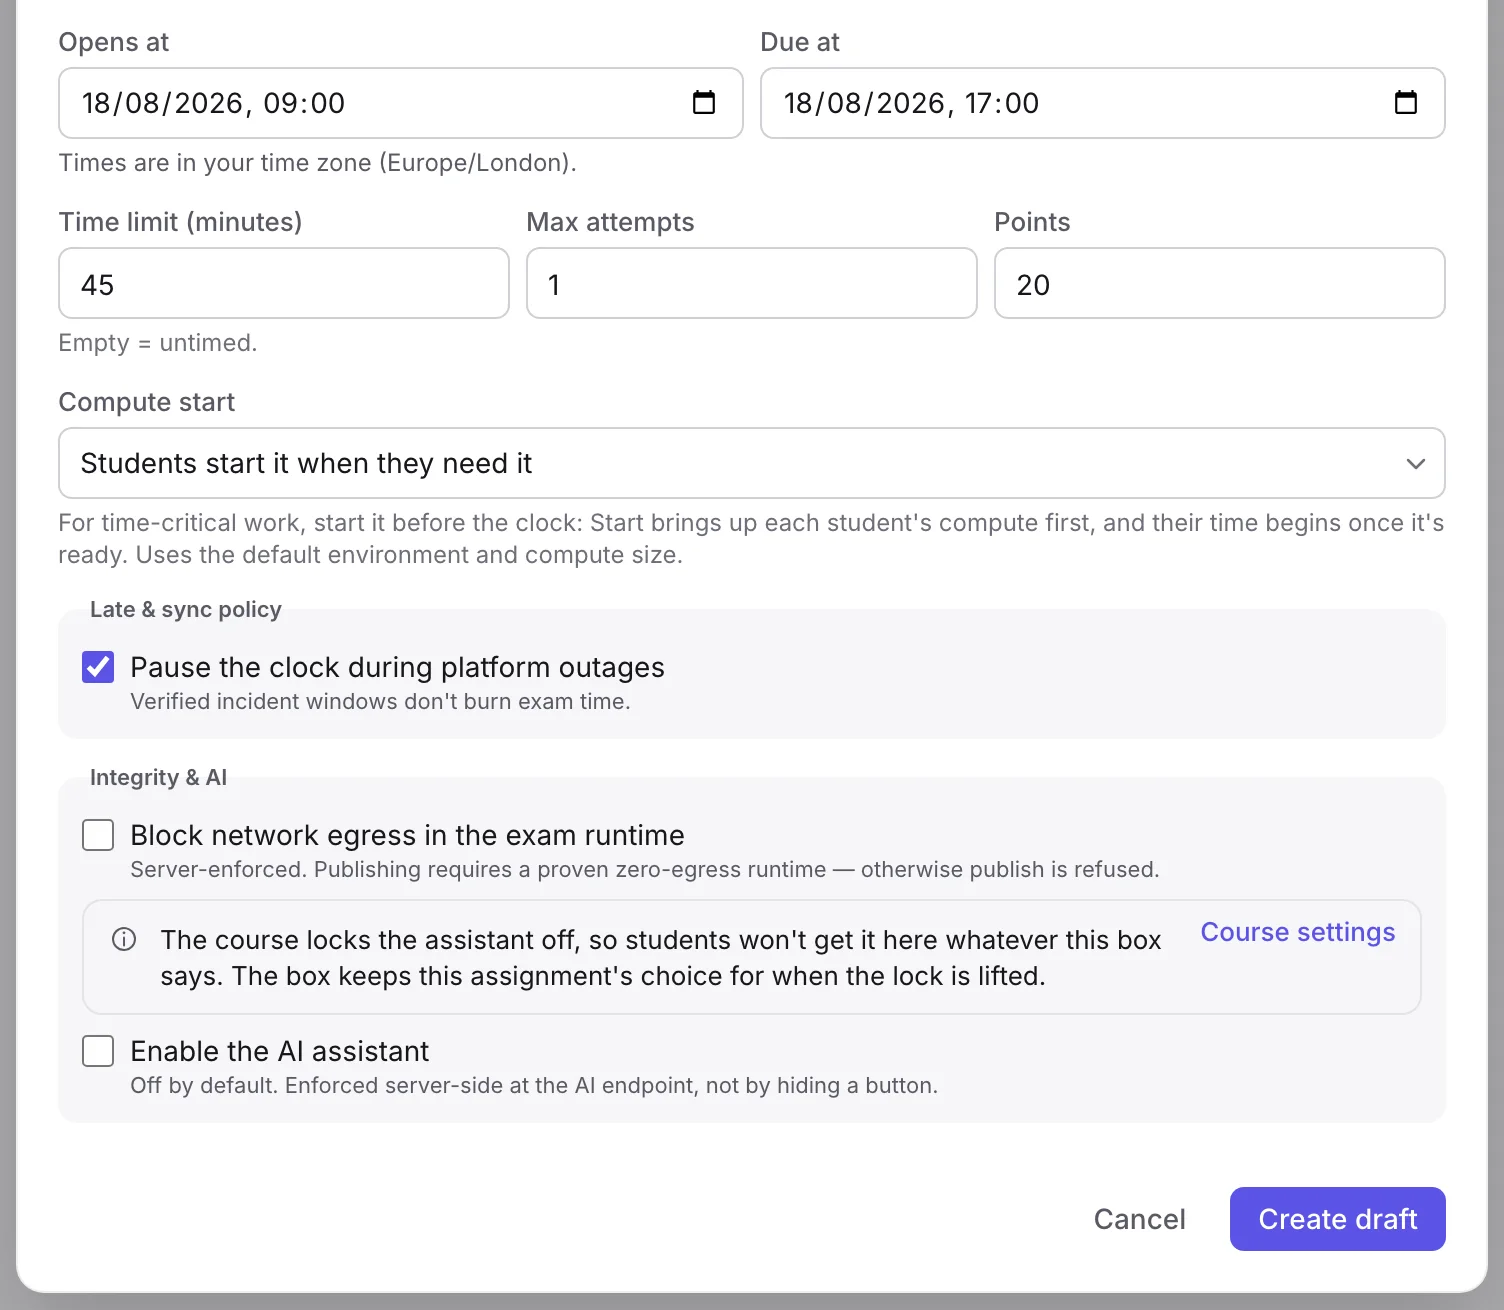
In the course, open Assignments, press New assignment, fill in the form and press Create draft.
| Setting | What it does |
|---|---|
| Title, Instructions, Points | Shown to students on the brief. Instructions are written in Markdown. |
| Template project | The project each student’s copy is made from. |
| Opens at | Students cannot start before this. |
| Due at | The deadline. Anything not submitted by then is handed in by the server. |
| Time limit (minutes) | How long each student has once they start. Leave empty for untimed work. |
| Max attempts | How many times a student may start. The default is 1. |
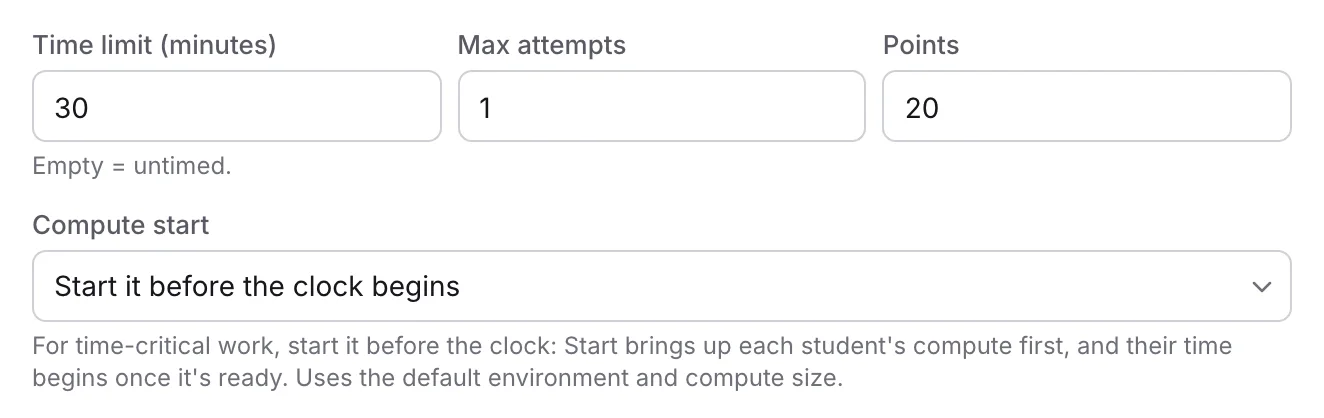
| Compute start | For time-critical work, choose Start it before the clock begins: each student’s compute starts first and their time begins once it is ready. Otherwise students start it when they need it. |
| Work syncing after the deadline | Strict: late manual submissions are refused and later syncing does not update the submitted copy. The other option can include work received within 10 minutes if marking has not started, and flags it. |
| Pause the clock during platform outages | On by default. A recorded platform outage is added back to students’ time. |
| Block network egress in the exam runtime | Students’ code cannot reach the internet. Needs a runtime your admin has set up; ask before your first exam. |
| Enable the AI assistant | Off by default. See The agent in your course. |
| Environment and compute | The software and machine size students get. Defaults come from course settings. |
3. Preview, then publish
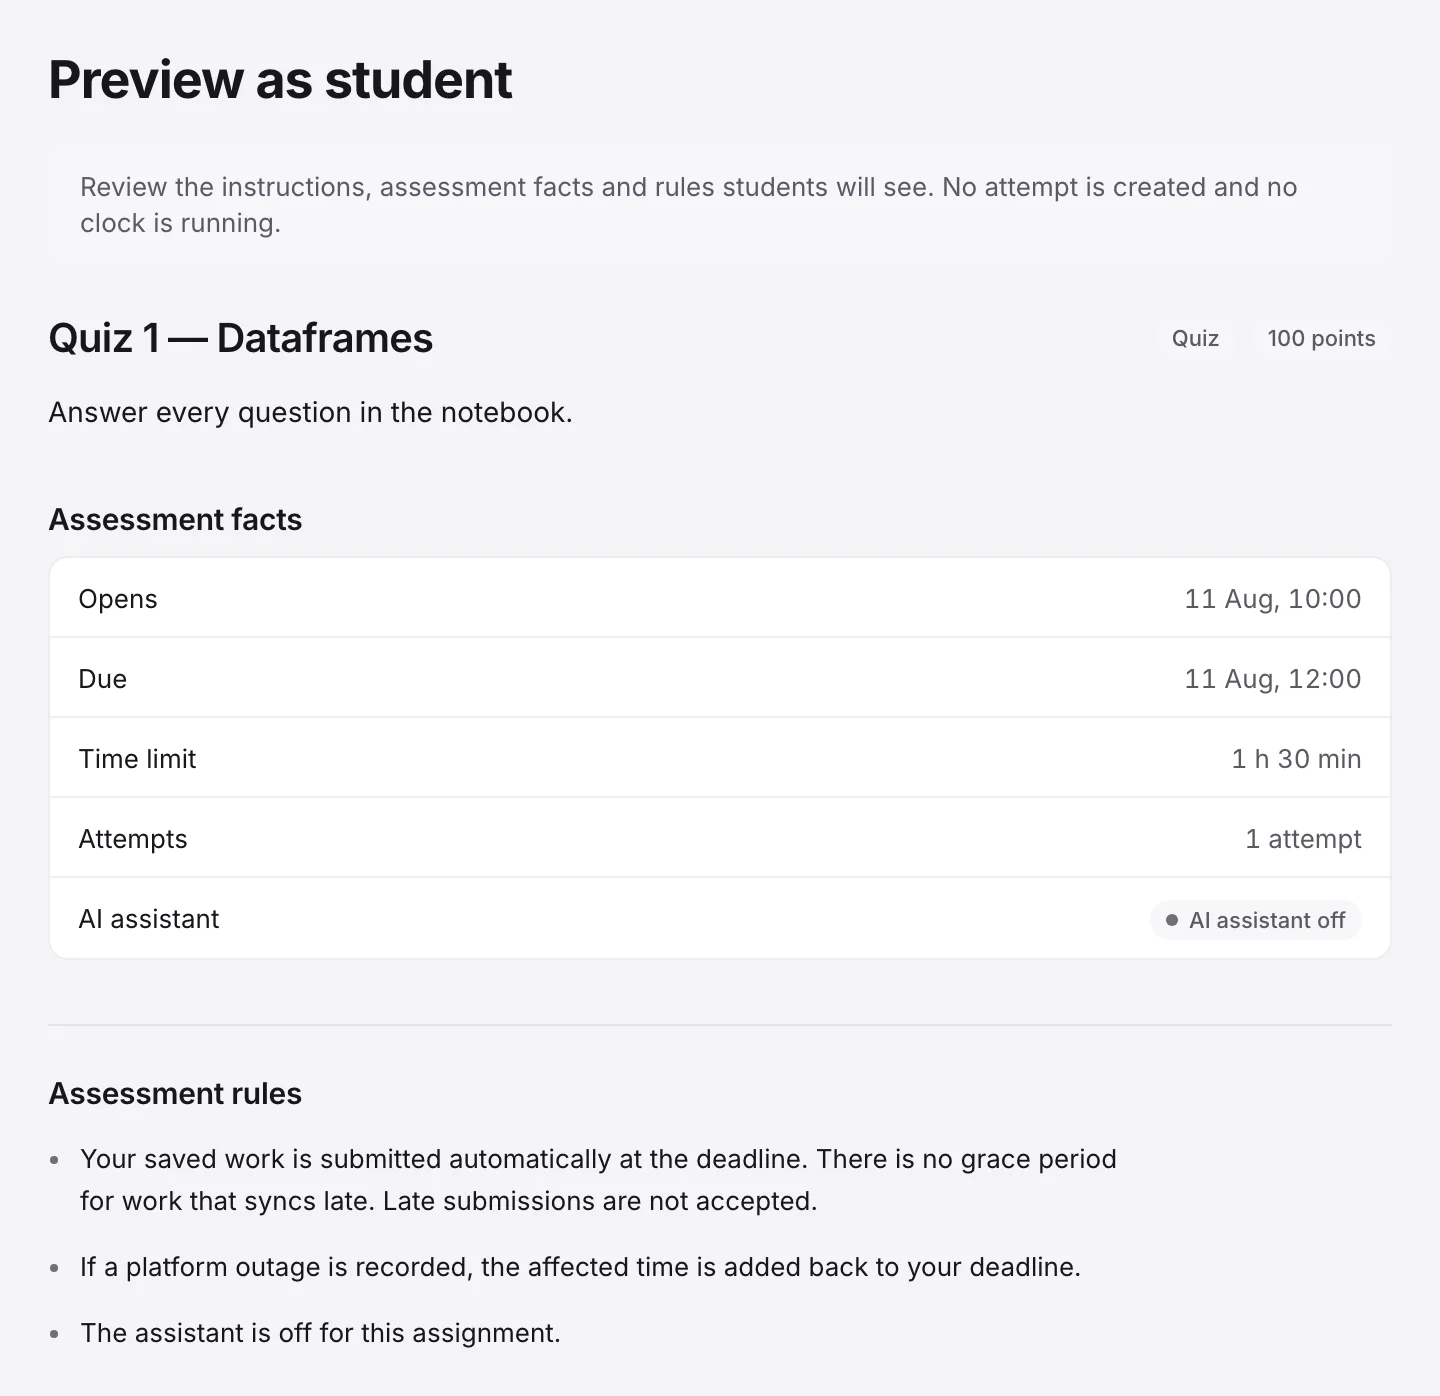
Every assignment starts as a draft that students cannot see. Open it and press Preview as student to review the instructions, assessment facts and rules your settings produce. When it says what you mean, press Publish on the Overview tab.
Automatic coursework and teams
If your workspace has turned on automatic coursework, choose Coursework · automatic at the deadline under Submission method, then individual or group work. Set the starting files, deadline and course-funded storage per project. A template can contain any project files; copying an existing project keeps personal conversations and permissions out of the assessment.
Choose student invitations or Instructor assigns students. Use Create and assign team to select unassigned students together. Each student belongs to one team per assessment. Set a team-lock time; instructors can correct a working roster with a reason. Corrections stop the runtime before the updated team restarts it.
Ai8 closes new writes at the deadline and records one immutable receipt per team, including its credited members. Storage is funded by the course and can be increased for an individual project. Compute is charged to its starter. A team extension stops the old runtime and preserves earlier receipts when work is reopened.
Grade the team's submission using the assessment's grading team and release rules. Individual grade adds a private score and feedback for one credited member without changing the shared grader. Allow late recovery work can be changed in Settings, including after the deadline. It defaults off for new coursework created in the app; existing assessments keep their setting. Disabling it prevents new attachments and preserves earlier ones. Attachments show their received times and file differences. Accept as supporting material records an instructor decision without replacing the original or changing the grade.
The assignment page
Click an assignment’s title to open its own page. Everything about that one assignment is there.
Overview
Where it stands, its settings as facts, how far submissions have got, Publish or Unpublish, and Archive or Restore.
Grading
The submission queue and the release controls.
Monitor
The live roster during an assessment, and the extend controls.
Settings
The form above, Accommodations, and Delete draft.
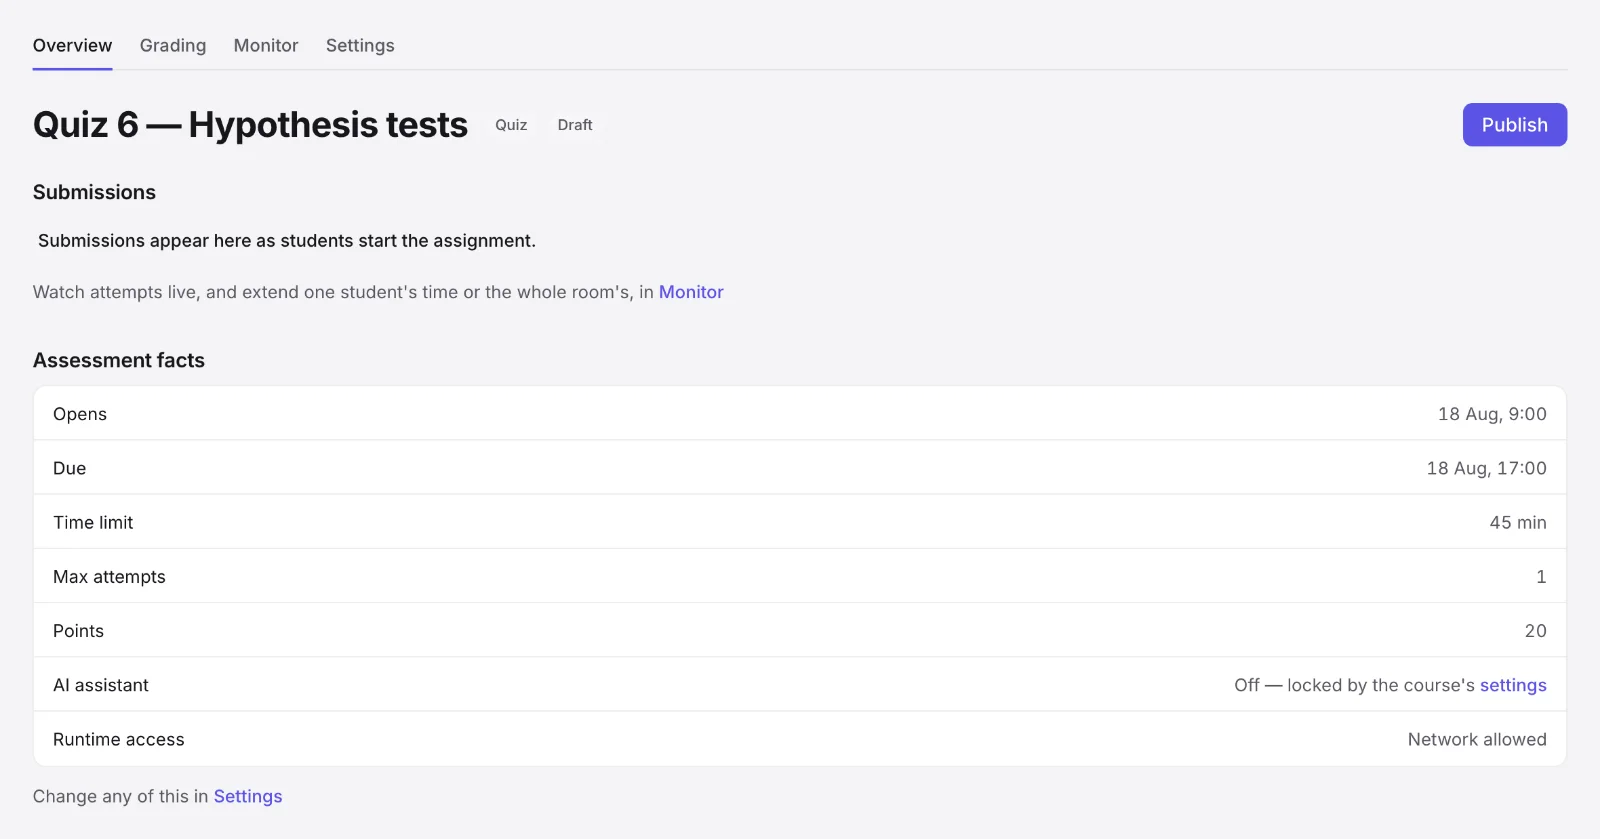
For published work you will not mark, such as a practice quiz, press Archive on the Overview tab. It leaves the course page, students’ grades, the gradebook and the grading to-do, and nobody can start a new attempt. Students keep their projects, and every attempt and grade is kept. It waits under Archived on the course home, and Restore puts it back as it was. Instructors and workspace admins can do this; TAs cannot.
The agent in your course
The agent is the AI assistant built into Ai8. It works inside a student’s project: it reads their files, explains errors and methods, edits notebook cells and runs code, asking the student before each change. It is as useful to you, for building a template or drafting a solution notebook in your own projects. You decide where students may use it.
| Switch | Where | Effect |
|---|---|---|
| Per assignment | Assignment settings, Enable the AI assistant | Off by default. Turn it on for work where the agent is allowed. |
| Whole course | Manage, Settings | Turning it off locks the agent off for every assignment, whatever each one says. |
The switch covers the agent as a whole: its answers, its tools such as web search, and inline code suggestions.
What it remembers in your course
The agent keeps short notes between chats: a student’s own, which follow them everywhere and which nobody else can read, and a project’s, which everyone who can open the project reads — in coursework, that includes you, beside its files. A Memory setting on the course and on each assignment chooses what applies in coursework: Full (the default), This project only, which keeps a student’s own notes out of your course, or Off. An assignment may be stricter than its course, never looser, and students see which applies beside the composer.
During a timed assessment
If an assessment has a time limit and the agent is off, a student who has started it cannot use the agent anywhere, in any project, until they submit or the deadline passes. They are told: Your timed exam is running. The assistant is off until you submit.
LLM API access
Students can call large language models from their own code in Ai8, with no API keys for you to hand out or for them to keep secret. In a notebook with a runtime running, they use Ai8’s small Python package, ai8, or call a plain HTTP endpoint from R or anything else, with any model your workspace lists and nothing to install. It is meant for courses where a model is part of the work, such as text classification, data extraction or comparing models. The student guide shows how to call it.
A class gets it through a plan, not through a course or an assignment. A student has the LLM API when their plan sets a limit for it; one whose plan leaves it out is told The LLM API is not included in your plan. Ask your workspace admin. Before the first exercise, ask your workspace admin to put the class on a plan with an LLM API limit, as you would for compute. They can assign the whole class list at once, and a student who has not joined yet starts on the plan when they do. The assistant switch on an assignment does not cover it: a student’s own code can call a model in an untimed assignment whether the agent is on or off.
A timed assessment is different. While a student has started one with the agent off, their code cannot call a model anywhere, in any project, until they submit or the deadline passes: The LLM API is not available during an exam. An exam runtime with no network access has no LLM API at all, whatever the agent setting. A timed assessment that allows the agent allows the LLM API too.
Each student sees their own use: a percentage under Usage limits, and their recent requests under Personal settings, LLM API. You do not see it in the course; your workspace admin has a report by member. In a group project, requests count against whoever started the runtime.
Runtimes in your course
A runtime is the machine that executes a student’s code. Each student gets their own, started the first time they press Run. Three behaviours shape how you set work.
A run outlives the browser
Once a student presses Run, the code finishes on the server even if they close the tab or lose their connection, and the output is saved. Long jobs are safe to set.
Idle runtimes stop by themselves
When nothing is running and the student has stopped using it, the runtime stops after its idle limit. Outputs are kept; variables are not. Running code is never cut short by this.
Compute can start before the clock
For timed work, set Compute start to Start it before the clock begins, so a cold start does not come out of a student’s time. See the settings.
Extra time
Open the assignment, then Settings, Accommodations. Choose a student or a whole section, then grant a time multiplier such as 1.5, extra minutes, or both. Instructors only.
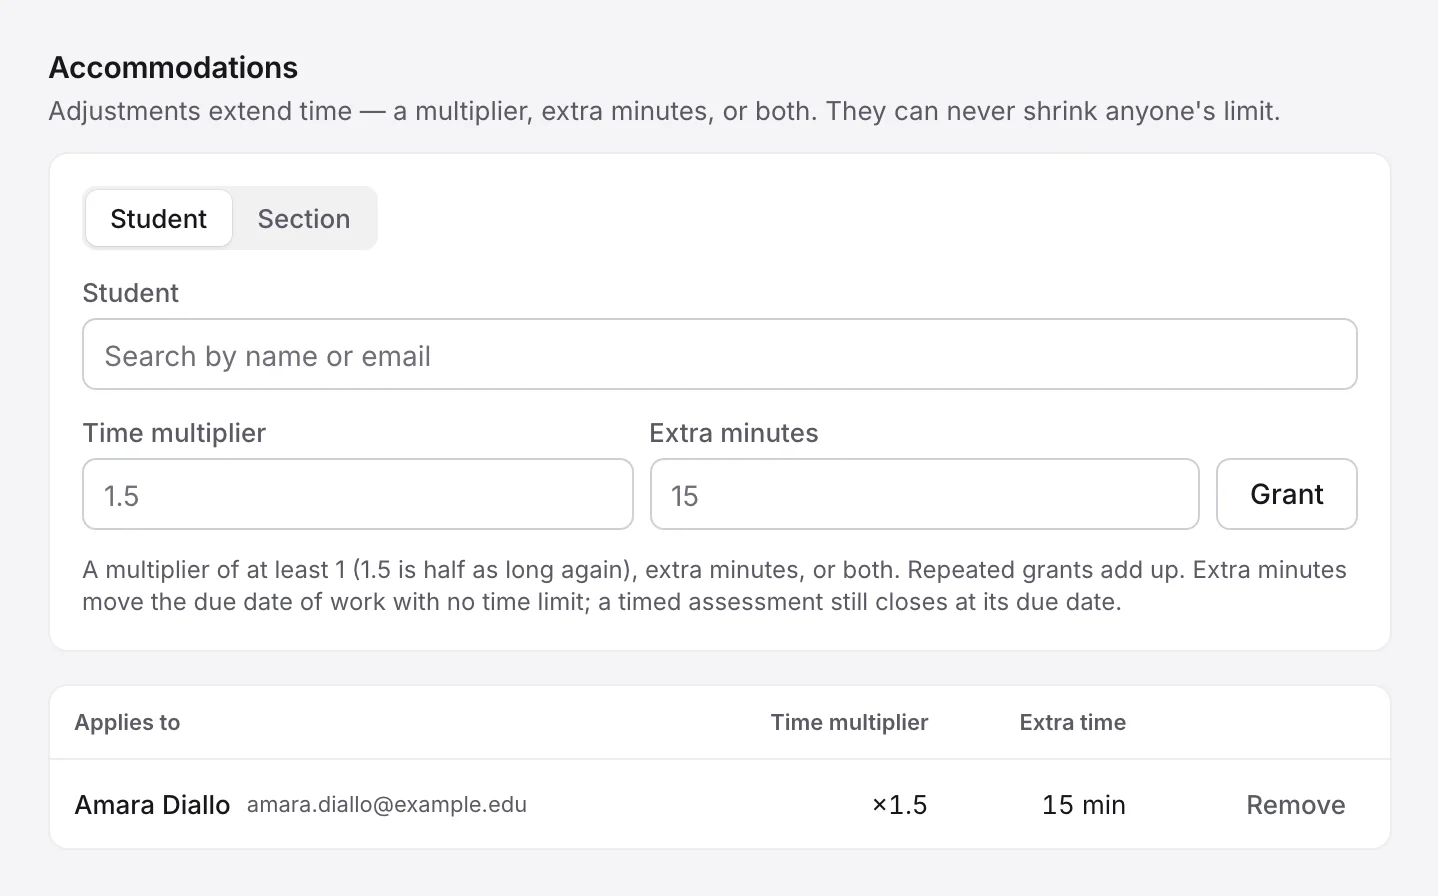
- Adjustments only ever add time. Nothing can make a student’s deadline earlier.
- On work with no time limit, extra minutes move that student’s due date. On a timed assessment, time lengthens the limit, and the due date still closes it for everyone, so set the window to fit the longest limit you grant.
- Set them before the assessment opens when you can. The student’s brief then shows their own longer limit.
- Removing a grant affects attempts not yet started. An attempt under way keeps its deadline.
The live monitor
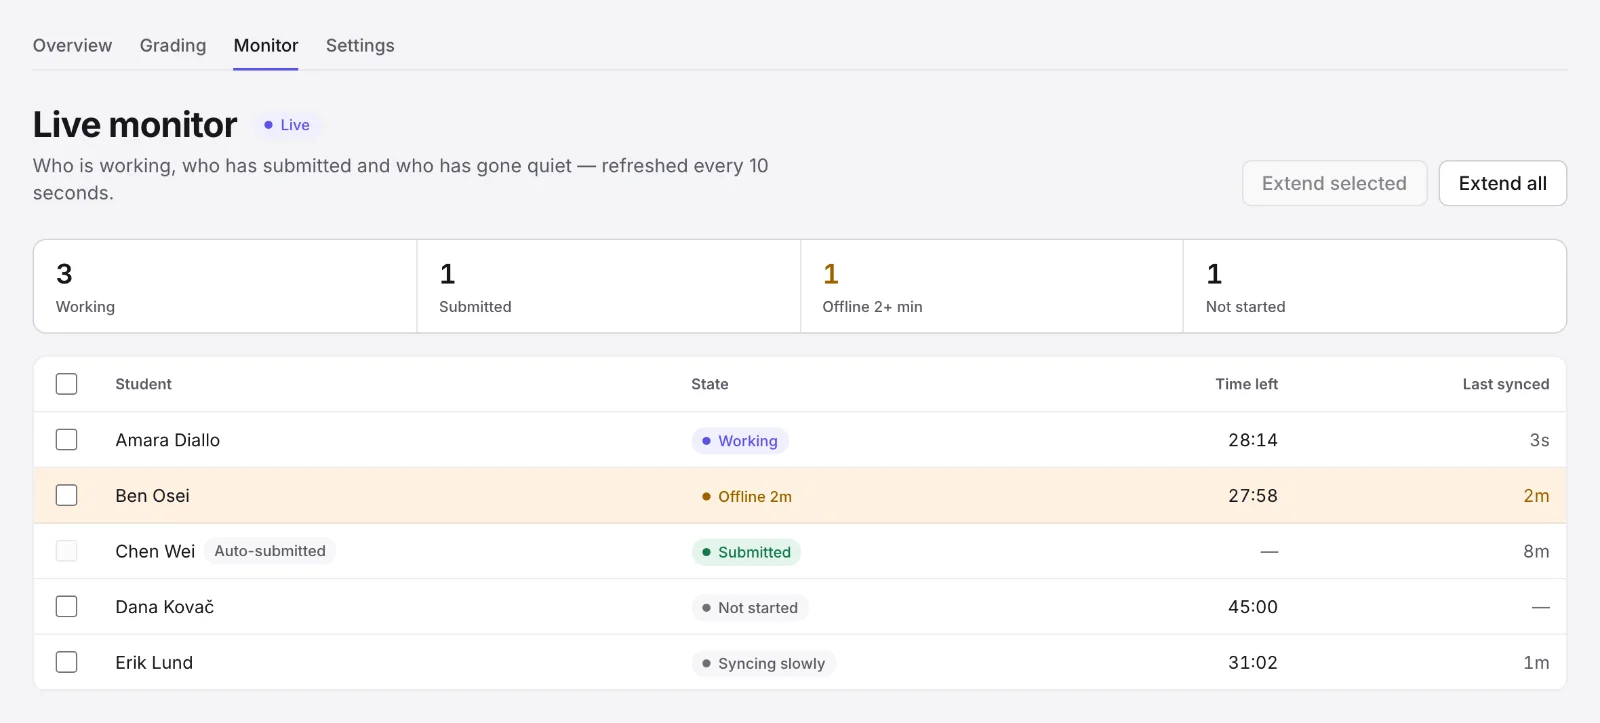
During an assessment, open the assignment’s Monitor tab. It lists every enrolled student and refreshes every 10 seconds.
| State | Means |
|---|---|
| Working | The server heard from their session in the last 45 seconds. |
| Syncing slowly | Last heard from between 45 seconds and 2 minutes ago. |
| Offline 3m | Nothing for over 2 minutes, with the real age shown. Worth walking over. |
| Submitted | Done. |
| Not started | No attempt yet. |
The state shows whether a session is connected, not how hard anyone is working. An Auto-submitted flag marks a student whose work the server handed in at the deadline.
Extending time
- Extensions apply on the server at once and add up if you extend twice.
- On work with no time limit, an extension moves that student’s due date. On a timed assessment, it lengthens the time limit but never runs past the due date.
- TAs can watch the monitor but cannot extend.
If Ai8 itself has a problem
For a local problem, such as one room’s wifi, extend from the monitor. For a platform outage, a workspace admin records the outage window and that time is added back to every affected deadline, on assignments that have Pause the clock during platform outages on. Agree who does this before exam season.
When a student goes offline
You will be asked “my wifi died, what happens?” Here is the answer, in the order a student needs it.
Their work is safe. Edits are saved in their browser as they type and sync when the connection returns. A crash or reload does not lose them.
The deadline does not move. It is kept on the server, and their countdown stays correct even offline.
The server submits for them. At the deadline, every unfinished attempt is handed in automatically, from what the server has received. It shows as Auto-submitted in your queue.
Announcements
Under Manage, Announcements, write a title and a message. Tick Also send as email to the roster to email everyone active in the course. The button then says how many people it reaches, and asks once before sending.
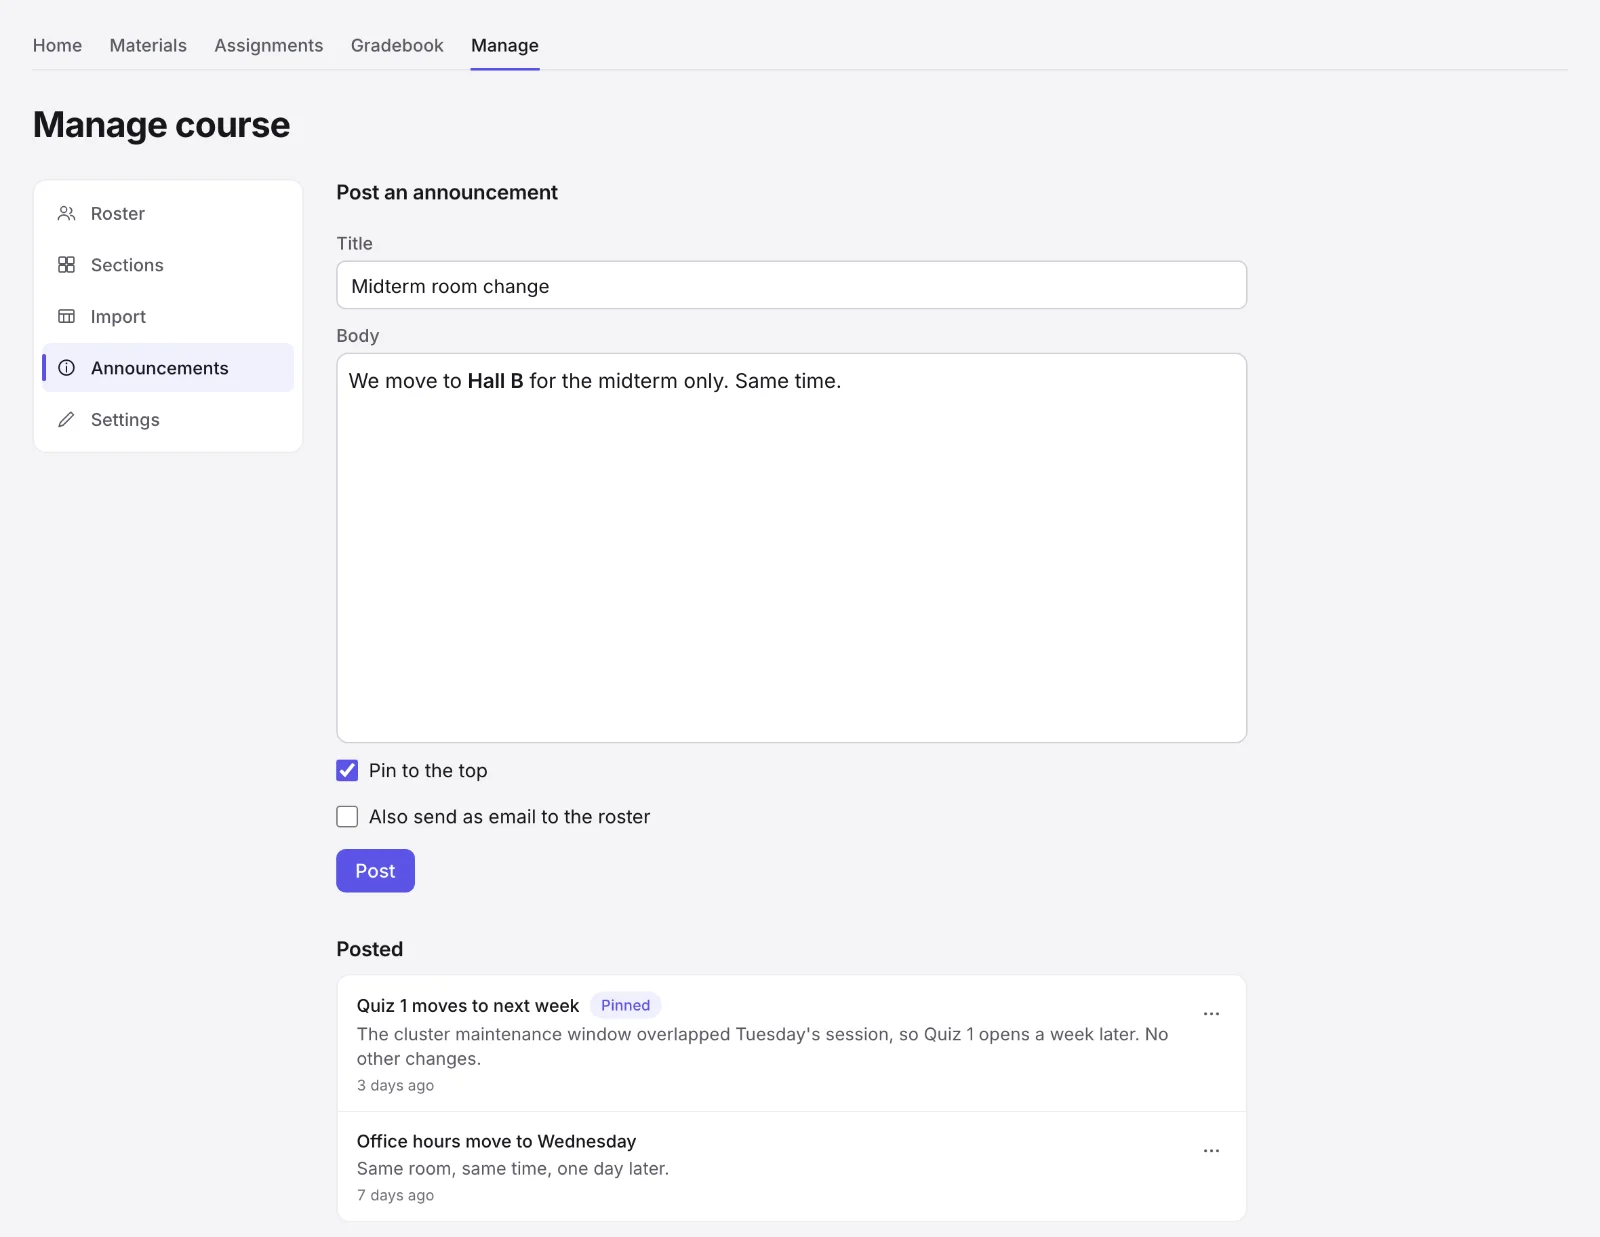
- Pin an announcement to keep it at the top of the course Home.
- Editing an announcement updates it in place and never sends another email.
- Students see a new announcement the next time they load the course. If it is urgent, send the email.
Grade submissions
You grade each submission yourself, with a score, an optional rubric and written feedback. Start from the course Home line 2 to grade, or open the assignment’s Grading tab.
Press Grade next. It opens your next submission: the oldest of your own when work is assigned to graders, otherwise the oldest that nobody else has open.
The notebook opens ready to read and edit, with code and saved outputs. No runtime is needed to read them. Edits and new run results save to this submission; Original hand-in keeps the student's captured work available for comparison.
To test the notebook, choose Start runtime once, or run a cell. Moving to the next submission then starts a clean execution session automatically, with only one grading runtime active.
Enter a score. Out of is filled in from the assignment’s points.
Optionally score against rubric criteria, and write feedback. Feedback is Markdown and shows as students will read it.
Press Save & next to save and move to your next submission.
The toolbar keeps runtime actions beside the file selector. Auto-stop & usage opens the usual runtime settings. The assessment's captured environment and compute size apply, charged to your allowance; an exhausted allowance prevents a start. Moving between submissions keeps the idle setting and shutdown deadline within current limits. Stop or automatic shutdown ends continuation until you start again.
Hide grading gives the notebook the full width; Show grading restores your draft. Previous and Next save changed grading fields before moving, and keep you on the current submission if saving fails. Releasing grades is a separate step.
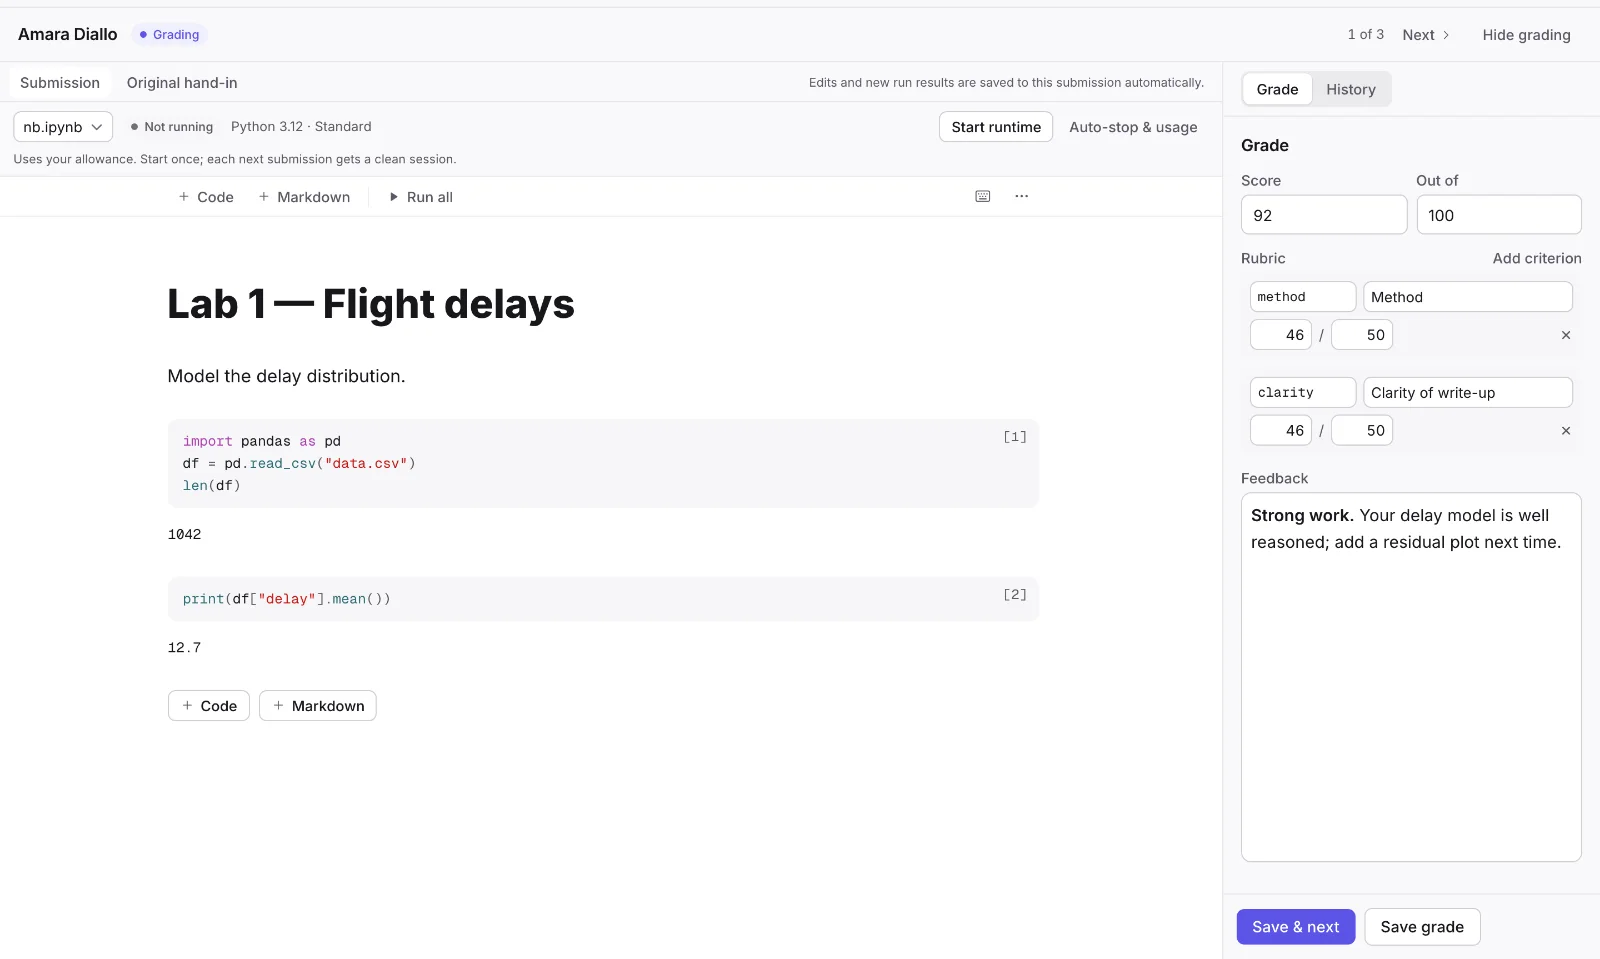
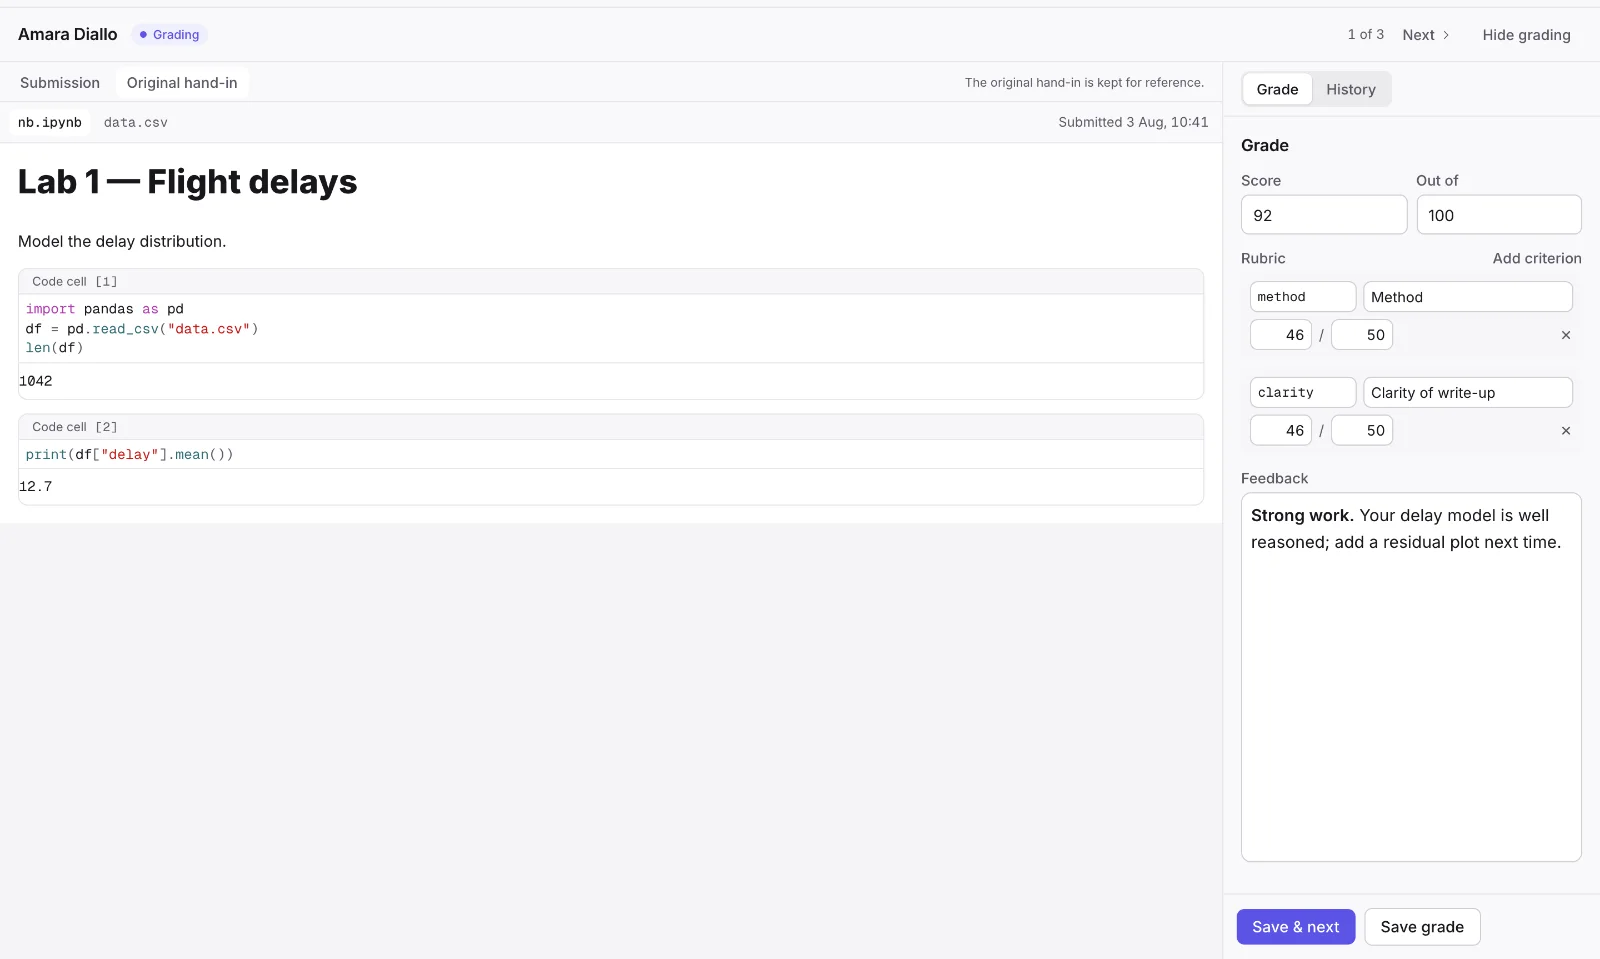
- Original hand-in — The captured notebook and files, preserved for comparison with your edited submission.
- Score — The score and what it is out of. Out of is filled in from the assignment’s points.
- Rubric — Optional criteria, each with points awarded and a maximum.
- Feedback — Written in Markdown, shown as the student will read it.
- Save & next — Saves this grade and opens your next submission to grade.
Rubrics
A rubric is a list of criteria, each with points awarded and a maximum. Build it on the first submission you grade. Each later submission opens with the same criteria and the points left blank, so you only fill in the numbers. A criterion left blank stops the save; remove the ones you do not use.
Grading as a team
A submission shows Grading while a reviewer has it open and active. Leaving, hiding the page or becoming inactive returns ungraded work to Submitted; opening it earlier does not keep it in Grading. The queue updates every 15 seconds. A disconnected browser can take three minutes to stop showing as active, then clears on the next update. Saved grades keep their Graded or Released state.
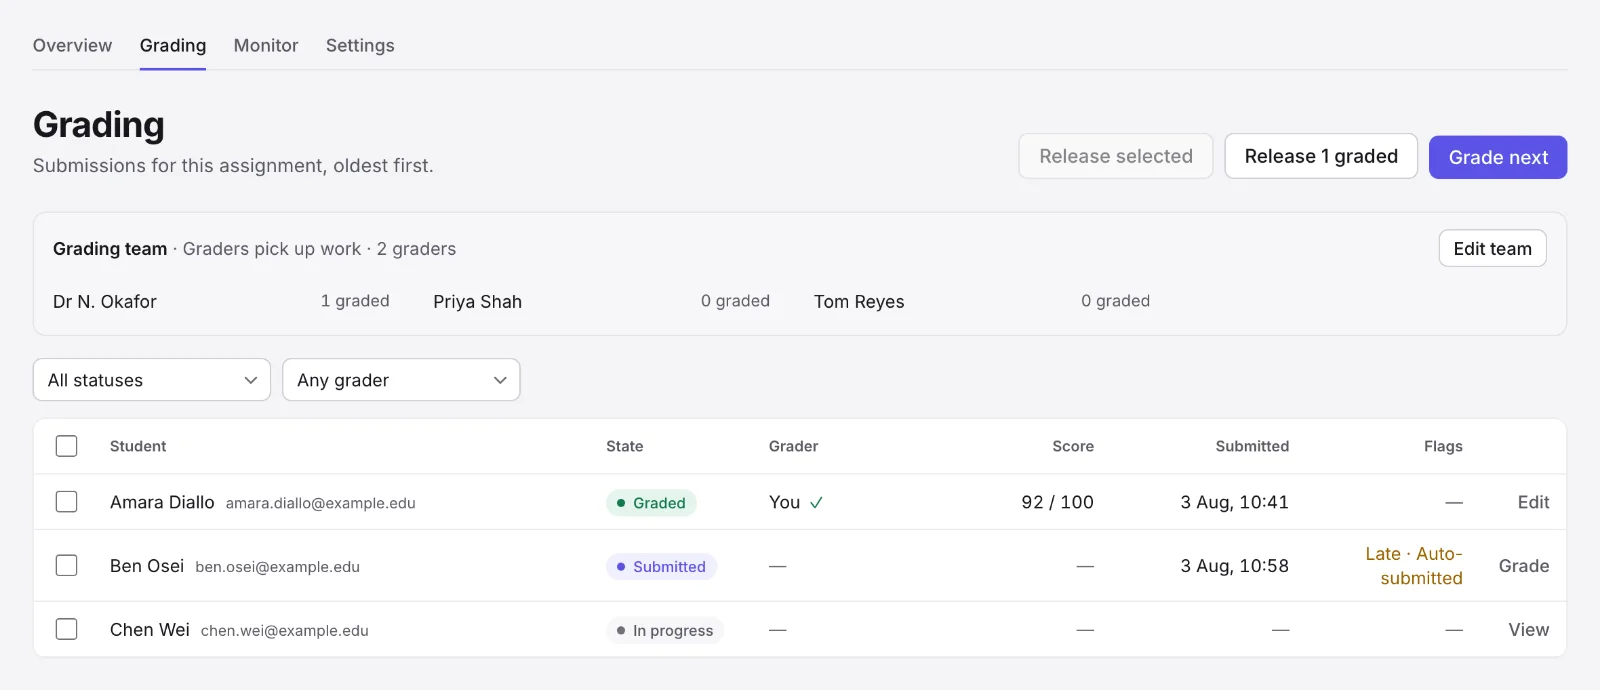
Each assessment has a grading team: every TA on the course, unless you change it. The Grading team panel on the Grading tab shows who is grading and how far each has got. Edit team chooses who grades this assessment and how work is shared:
Graders pick up work. Anyone on the team presses Grade next; it skips work another grader has open or has graded.
Assign each submission to a grader: Evenly, at random, Set how many each grades, or By section. Students who hand in later go to whoever is furthest below their share. To hand-pick, select rows and choose Assign to.
The first person to grade a submission is its grader. A TA can edit their own grade until it is released and reads everyone else’s. Instructors and workspace admins can change any grade; the change is labelled as theirs and can carry a note for the history. History, beside the feedback, shows who was given the work, every grade and change, and the release. Students never see it.
Flags on a submission
| Flag | Means |
|---|---|
| Late | It reached the server after the deadline. Late work is accepted and flagged, never discarded. No penalty is applied automatically. |
| Auto-submitted | The server handed it in at the deadline, from the student’s last synced state. |
Release and export
Graded is not released. Until you release, students see nothing about the grade: not a locked row, not a greyed score. Instructors and workspace admins release; TAs do not see the release buttons.
On the Grading tab, press Release 3 graded to release everything graded, or tick submissions and press Release selected.
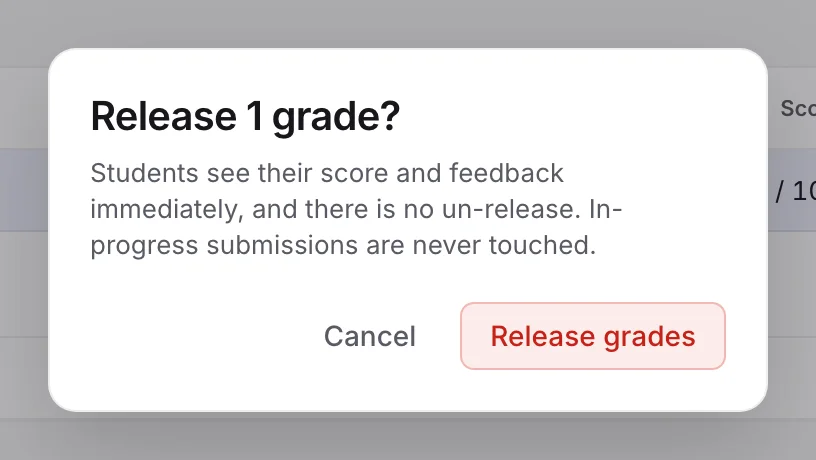
Read the confirmation. It says how many grades will be released and what stays hidden.
Press Release grades. Students see the score and feedback under My grades at once.
The gradebook
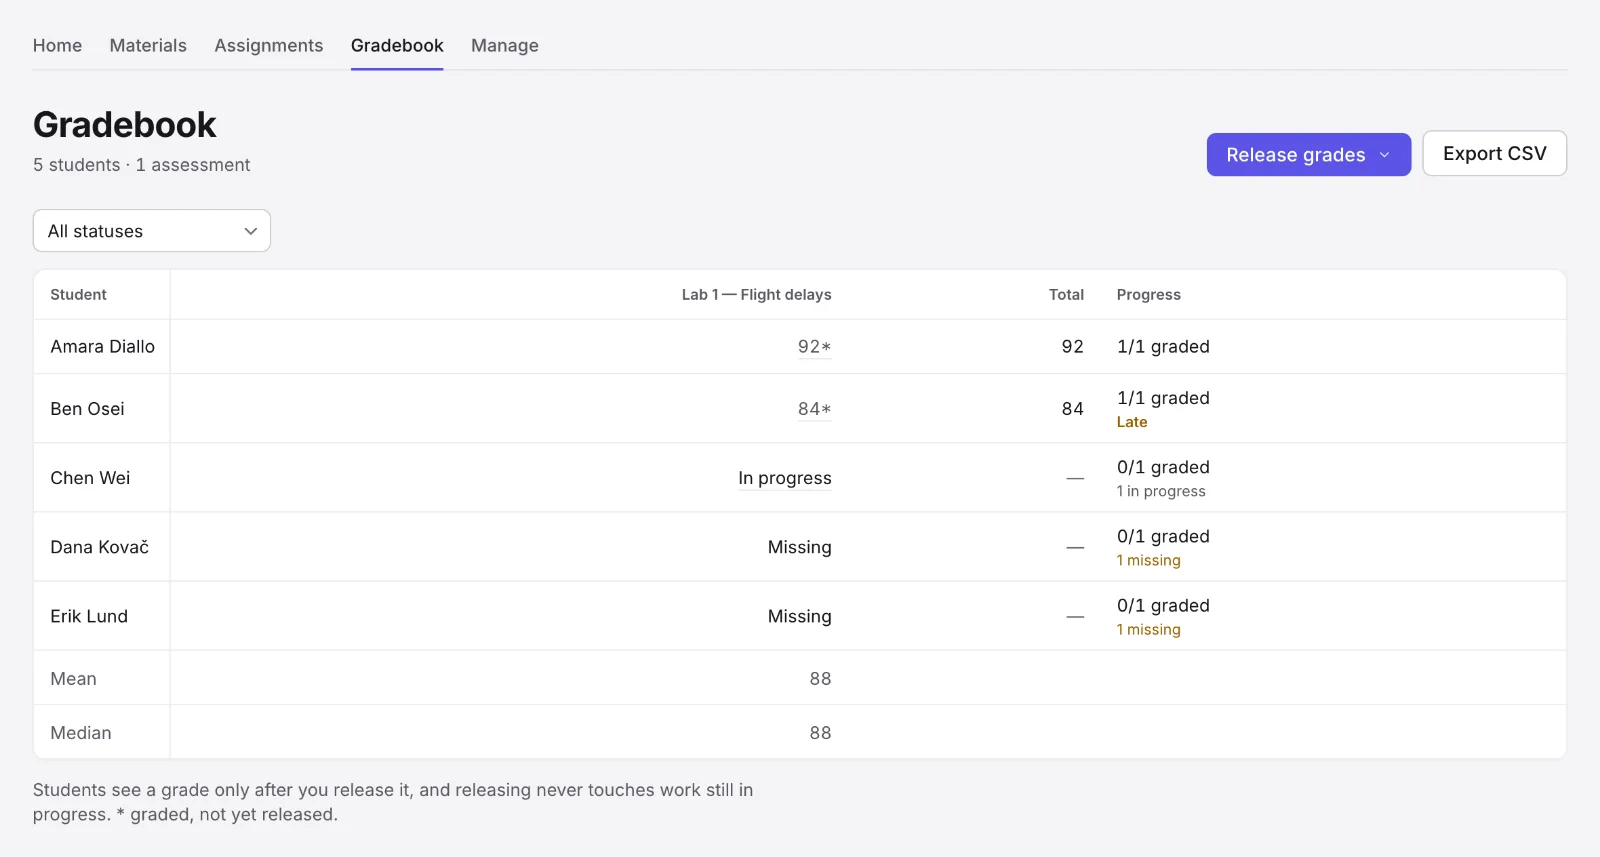
The Gradebook tab shows students by assignments, with a total and the mean and median. A grade marked with an asterisk is graded but not yet released. The Progress column shows how much of each student’s work is graded and what is missing.
Export
Press Export CSV. Each row is a student, each column an assignment, and the last column is the total. A cell holds the score, or the submission status if there is no score yet, so you can tell “not graded” from “never submitted”.
Integrity
What the server enforces
- The deadline, and automatic submission at the deadline.
- The number of attempts, with one active attempt at a time.
- Extensions that can only add time.
- The agent being off for an assignment, and off everywhere during a timed exam.
- No network access in an exam runtime, when you choose it.
- Unreleased grades being invisible to students.
- An audit record of every extension and release, with your name.
Design that holds up
Per-student variation
Write the variation into your template, for example data seeded from a per-student value.
Ask for reasoning
Applied, open-book tasks that ask students to explain what they did and why.
A short follow-up
A brief oral walk-through of the work for high-stakes marks.
The submitted work
Review the submitted snapshot and any late-sync flag when discussing a student’s process.
First-term checklist
Before term. Create the course and sections. Import the roster with a preview. Decide where the agent is allowed.
If you want exams without internet access, confirm with your workspace admin that the isolated runtime is set up. Publishing is refused without it.
Create one assessment and preview it as a student. If the brief does not say what you meant, change the settings.
Grant extra time before the assessment opens.
On the day, keep the monitor open and watch for students who are offline. Extend with a note if a room loses its connection.
Afterwards, grade from the queue, look closely at anything flagged, release deliberately, and export the gradebook.
Troubleshooting
There is no Publish button on my draft
A draft needs a template project before it can be published. Open Settings on the assignment and choose one.
Publishing was refused when I ticked “Block network egress”
That setting needs a network-isolated runtime that your workspace admin sets up. Ask them, or untick it for now. The refusal is deliberate: it stops an exam running on a runtime that is not actually isolated.
I cannot change the template or unpublish
The template and the two integrity settings are fixed while an assignment is published. You can unpublish only before it opens and before anyone has started.
A student says they cannot see the assignment
Check that it is published, not a draft, and that the student is active on the roster. An invited student is enrolled only once they accept the invitation.
A student did not get their invitation
Ask them to check their spam folder for “You’ve been invited to … on Ai8”. If it is not there, ask your workspace admin to resend the invitation; a resent link replaces the old one.
I turned the agent on but students say it is off
The course-wide switch under Manage, Settings may be off, or a workspace admin may have it off for the workspace. Either of those overrides the assignment.
A student’s code will not run in their assignment
They may not have access to the environment or compute size the assignment uses. Choosing one for an assignment does not grant it; ask your workspace admin to grant it to your students.
A student has used up their assistant or compute allowance
An allowance set for a term runs until its date and does not reset by itself. Ask your workspace admin to raise that student’s limit. An assessment that starts compute before the clock still gets its compute in the meantime.
A student’s runtime stopped during a long job
Ask what their Runtime panel says. A stop without activity means nothing was running and they were away: their outputs are saved, and they run the cells again. A stop at the time limit means the job ran into the runtime’s time limit. Next time they can press Extend beside Time limit in the Runtime panel before it is reached; the panel warns them in the last 15 minutes. If a job needs longer than the panel allows, ask your workspace admin. Code that is running is never stopped for being idle.
I cannot remove a student
A student with submissions cannot be removed. Drop them instead; their record is kept.
I am a TA and cannot find Manage, Release or the extend controls
Managing the roster, distributing materials, extending time, granting accommodations, setting up the grading team, releasing grades and archiving an assignment are the instructor’s. Ask an instructor on the course.
A student got back online after the exam with more work
What the server had received by the deadline was submitted automatically. Later work is still in their project. Ask them what changed and decide how to treat it.
Get help and get in touch
We want to hear from you, whether something is broken, something is unclear, or you have an idea.
Ai8 support
Something is not working, or you have a question this guide does not answer. Tell us the course, the assignment, what you were doing and when.
support@ai8.ioTell us what is missing
If Ai8 does not do something your course needs, or something is harder than it should be, tell us. Requests from the people teaching with it decide what we build next.
Send a suggestion